New seat for the Bolens/Iseki tractor
June 4, 2020


When the 1980 Bolens G174 was pressed into garden-watering duty this month, the ancient tin seat crumbled under the attention, so I was in the unenviable position of having to fit a replacement which came with many threaded holes in the bottom of the pan, but nothing for the pivot pin which holds the seat to fit into.
There were a few pieces of 2X2 steel angle iron leaning in a corner of the shop and a 14″ cut-off saw, so I set about to fabricate something. I tried ripping the 12″ piece of angle to reduce its contact thickness toward the rear of the seat. That worked reasonably well for the right side, but then it is always more difficult to do the other one. I drilled and bolted the end of the second piece to the blade slot at the rear of the chop saw and had at it with the saw, popping a 15A breaker in the shop several times before I moved the material around in the slot to reduce the contact point for the blade.
Then the drill press produced a couple of nice holes for the pin, but that left the seat tilted forward at a very awkward angle, and putting undue pressure on the operator’s lower back. This would not do. I had to raise the front of the seat.
Planning to weld something to the front of the rails I had fabricated, I cut a 1 1/4″ cross section of angle iron, thinking I would split it and see how that fit. Instead I took the angled piece to a granite boulder near the shop, placed it on the makeshift anvil, and clobbered it with my 8 pound sledge hammer. On the first attempt the steel vaporized, only to re-appear some thirty feet away on the driveway. Next try it took its punishment and flattened out sufficiently that the drill press vice could hold it, so I ran four holes into it and another one for the other side, sanded off the burrs on the 12″ disk sander, and bolted the new flanges to the rails with a view to welding them into place.
“If I weld these flanges, they will no longer be adjustable. What if I just over-tighten the bolts and try that temporarily?”
The temporary fix seems to have worked. It widened the footprint of the seat front to where the pin had room to fit with both rubber grommets attached. After a test drive I spotted a can of black spray paint, so I had at the fresh metal surfaces before rust set in.
So far, so good.
BTW: The seat came from TSC Canada, was made in Turkey, I think, and cost about $185 CDN plus taxes.
UPDATE: 11 December, 2020. That new seat is very comfortable, and has worked all summer without adjustment or repair. I find it at least as good as the upscale $300 Kubota seat I bought from the dealer to replace the crappy original one which came on my B7510. The Bolens received a lot of hours this summer and fall. The Kioti eventually took over watering duties for the garden, but the Bolens skidded to the burn pile many pines which had died from blister rust amid the various tight stands on the property. It also ran the generator a couple of times during power outages. Its little Mitsubishi twin cylinder engine is still my favourite diesel on the farm.
This morning we tipped over a 20″ elm which had died near the shops. The PTO winch on the TAFE did the job and enabled me to place the fallen tree in a rather confined area without damage.
The chain saw was low on power. Eventually I blew out the air cleaner and that improved things, especially the operating revs. Four tanks of gas and the cant hook Bet found in my shop, and the tree was sawn up.
Then came the 3 pt hitch wood chopper. Run by the Kubota, it’s pretty good on dead elm branches up to 2 1/2″ and down to 1/4″. Tiny, stiff and long live twigs clog it up. So I took to hanging onto the tops of the branches I fed in, depositing the little stuff in a pile I’ll throw onto the trailer with the load of chips later. Standards aren’t high on woodland trail improvements, and this really cuts down on sessions with the chopper apart to clear blockages.
Next I’ll load the small wood into the loader bucket and have Bet dump it on the main wood pile. She’s been hanging around all day for the chance, I think.
The blocks will go upright on the little dump trailer with a side folded down (towed by the Bolens). From there I can swing them onto the block splitter (run off the Kubota’s hydraulics) without lifting them a second time. The pile of split wood then gets unceremoniously bucketed onto the main pile, topsoil, grass and all, with the TAFE.
Only trouble with all of this efficiency of effort is that I now burn very little wood…
Chipping my way to fitness day III: Chipper vs Pear Tree
April 11, 2018
Yesterday we finished up the two trees on the south field. 2 1/2 hours of uneventful chipping provides thin gruel for a blog characterized by the misadventures of a bumbler, so I resolved to do better today. This afternoon the chipper tackled the accumulated brush from three weeks of pruning around the farm. Things went very well until I decided to see what the limits of the machine really are. Then production stopped.
The above photo above looks much worse than it is. I had chipped the pear tree that the wind took down last week and was very pleased by the chipper’s success at reducing the twisted branches with their many perpendicular twigs to mulch. As I was pitching miscellaneous debris into the hopper I came upon a piece of rotten wood about four feet long and 4″ in diameter. It was very light, so I tossed it in to bung the twigs on through. When the blades touched it the thing apparently disintegrated. The dust consolidated some small twigs caught in the chute into a wooden concrete. With nowhere for the incoming chips to go, the machine soon overloaded, alerting my wife to warn me to shut down the Kubota. The chipper was well and truly plugged.
Clearing the blockage wasn’t hard, though it did require some shop tools.
Essentials include a 1/2″ steel rod to use to pry the flywheel around against resistance, followed by a piece of 2″ X 7/8″ white oak lath for further prying duties. The more challenging part was getting the accumulated crud out of the chute. In the shop I grabbed a cordless drill and a 3/4″ concrete bit about 2′ long. It freed up the blockage rather effortlessly, and the machine was ready for more work.
And hour and a half produced a half-load of wood chips which filled in a soft spot on one of the roads on the property. The chips are pretty useful for that sort of thing.
Steps as of 4:51 today: 10,536 steps. It turns out I am much more willing to walk to get a tractor than I am just to walk. A chipping session involves getting three pieces of drivable equipment into place. The Ranger contains most of the tools I need as well as the loppers for small branches and the chain saw for larger stuff. It also provides a comfortable seat for Bet, who correctly believes that I require some adult supervision when playing with this set of toys.
UPDATE, 14 April, 2017
April 12th we started off to chew up a large pile of silver maple boughs. Silver maple is a common soft maple, characterized by gently-tapered, vertical branches. Turns out those branches become too fine for the machine to chop up. I kept watching 12″ drinking straws popping up and down the chute, too stiff to bend around the curve and catching on the deflector at the top, then dropping back down to plug the machine.
Now I understand one of the videos I watched where the guy demonstrated a Wallenstein chipper/shredder. He would hang onto the branches as the coarse parts rapidly chipped away, then draw out the fine ends and toss them into this hopper on top where they would instantly get shredded.
I may try some variation on this, hanging on to the branches to recover the thin parts, then consign them to a brush pile or burn barrel, or even toss them straight onto the trailer with the chips. There aren’t a lot of of quality control inspections of the chips that go into a mud hole on a farm trail.
When the chipper does plug with the fine branches, BTW, it is quite easy to unplug because of the shape of the tapered chute. If it is just branches and not consolidated with dust, just grab something and pull the whole thing out.
Chipping my way to fitness I
April 9, 2018

We picked up a slightly used brand-name* wood chipper this morning in Osgoode, ON. It had appeared as an afterthought in a Kijiji ad for a Kubota B7510 tractor identical to ours. As promised, the Canadian-made Wallenstein* connected and was operating ten minutes after arrival at the farm.
My previous attempt to buy a wood chipper had resulted in an embarrassing return to the vendor of the unit. It looked identical to this one, but the flywheel was warped and I was convinced that it could never be operated successfully. So much for the imported clones priced at less than half that of the Wallenstein products.
After two hours and 17 minutes of relaxed chipping, my Fitbit registers 7,590 steps for the day. My heart rate peaked at 123 bpm and I have burned 2113 calories so far today.
I still have all ten fingers.
This might well be a fitness regimen which suits me. I am forever pruning my walnut trees, and until now I have hauled the cut branches to a growing pile on the property where I compact them together with the loader on my larger tractor.
But after three weeks of pruning this year and no burning done, the pile is beginning to crowd out young trees. As well, I could use a supply of wood chips.
My friend Les suggested renting a chipper for the long weekend. I responded that I usually only work for about an hour at a time. A marathon session to the tune of a raging gasoline engine on a self-contained rental unit would wear me out. I would much rather listen to my little diesel friends, Kubota and Bolens, as I chip away on the brush at my own pace in nice weather, channeling the chips into the dump trailer for distribution around the property.
Today’s task involved cleaning up the mess after I 1) burned the dried hay away from a downed Manitoba maple; 2)cut off the many branches to get at the trunk; 3) cut the trunk up into spring and fall firewood and removed it; 4) hauled most of the branches away on my dump trailer behind the Kubota.
Of course I had watched many videos of tractor-mounted wood chippers in operation. The most interesting title I saw was: “Another way to break your fingers.” When I started on the dry Manitoba maple branches, I quickly saw the point, though avoided injury from the twigs snapping back and forth as the branches enter the chopper.
For the kind of work it was doing today, the 21 hp Kubota seems well matched to the chipper. I have yet to notice the engine dying back in material up to 3″ in diameter. In fact, the larger green ash branches are easier to feed through the machine than the smaller, dried box elder ones. The Wallenstein’s* 425 pounds feels substantial behind the light tractor. I’ll leave on the three suitcase weights left over from bush hog operation in summer to balance the weight.
By the end of the day my Fitbit read 10,224 steps. That’s the most ever for me.
*The downside is that my new chipper is almost certainly not a Wallenstein product. There are lots of look-alike labels, but no “Wallenstein” brand label no “Made in Canada” label, and most important of all, no serial number. The problem is that I may not be able to order parts from Wallenstein without that identifier, and I need the bushing which separates the two halves of the chute. So I have paid almost full price for a used counterfeit. The bearings had not been torqued, and three of the blades had a bolt loose, with one twisted off. On the other hand it seems to have an authentic Italian PTO shaft.
UPDATE: I ordered the bushing from the local Wallenstein dealer using the part number in the brand-name model’s online manual. For twenty dollars I received in two days a pair of sturdy steel “c’s” which combine to provide a wear surface around the moving part on the chute of the chipper. My counterfeit model had the same parts made of black plexiglass. The colour was right, but durability was a definite issue.
Polaris Ranger TM part XXIV: wheel alignment
February 16, 2018
Online they say it’s a 20 minute job, so I planned to devote the entire afternoon in the shop to the task. My estimate was just about right.
I ran mason’s cord from the trailer hitch up both sides to jack stands at the front. Then I stretched the string across the leading and trailing edges of the rear tires to provide a straight line up each side at the hub. I measured the gap between the narrower front wheels and the string, usually between 1 1/2 and 2″.
When I locked the steering wheel with ratchet straps, I decided I needed to reduce the toe-out from over 1/4″ on either side to just under 1/8″ on either side.
I ran the Ranger up on the hoist a couple of times to get the adjustment right, and the job was done.
That’s the 20 minute version.
In reality the right wheel was toeing out to where the combined track at the front was just over an inch wider than at the back of the front wheels. Most of it was on the right hand side where I had replaced a tie rod end (I think they call it) by screwing it on as tightly as it would go.
It had broken off one day a couple of summers ago, so I ordered a pair of them online and replaced the broken one on a temporary basis so I could use the machine. It turns out when you twist those things onto the little metal rod which goes to the steering gear, you don’t make everything tight. Things are supposed to be sort of in the middle, to allow for adjustment with the grub nut. So I had to take the part off and re-install it. Then it was fine.
Ranger suspension components are much easier to work on than their Porsche equivalents, though there is a dearth of information about them. Old Porsches have likely the best documented repair procedures on earth, and that’s just You-Tube.
The Ranger now makes tight turns more easily, especially at full lock. With any luck the expensive new tires won’t wear off once I start daily runs to the mailbox over pavement.
The local municipality legalized UTV’s for the road last year (helmets mandatory), so it’s a political act to go the 4/10 mile to Forfar for the mail in the Ranger now.
Replacing a window in my tractor’s cab
November 17, 2017
My 1995 TAFE 35DI came with a very good loader and a cab fabricated in the dealer’s shop. Clearly the tractor had been used primarily for winter snow removal, as it had only 340 hours on it when I bought it in 2004.
The door is a little narrow for my girth, so that spring I decided to remove the entire cab as I had a lot of mowing to do around my trees. Peter Myers made a replica of the top part of the roll bar and we lifted the cab right off the tractor and stored it. Peter’s replica bolted neatly into place and the roll bar was again intact.
Next I ordered a vinyl roof. $700 later it arrived with a sticker “For the prevention of skin cancer.”
Fall involves switching the cap and the cab by lifting each in turn into place by a chain block attached to the top beam of the car hoist and maneuvering the tractor into position beneath.
But the limitation of this cab, or “half a cab” as Lloyd calls it, is that it consists of laminated glass sheets fastened with caulking to the outside of a 1 1/4″ square tube frame. Vibration and sudden wrenches on the cab frame tend to stress the glass panels. One particularly energetic session this spring had broken one small pane outright and stressed a couple of others.
We removed the broken pane and I took it to Kingston Plate and Window glass. No problem, they would make a copy of the broken part at $18 per square foot, rounded corners included. When I picked it up I asked for a tube of caulking to fasten the glass to the frame. That’s when the trouble began.
Basically, silicone caulking won’t do the job. They suggested I talk to an auto glass expert, so today in Smiths Falls I stopped in at Dave’s Independent Auto Glass to inquire. The two guys about my age were very helpful.
The key part of the process is the sanding of the frame down to bare metal and the application of a special primer to both the frame and the area of the glass to contact the frame. One guy exhorted me to mask the area of the window I didn’t want painted black, as everyone gets wobbly with the little brush which comes with the primer — a small furry ball on a metal stick like a shoe polish brush back when they had such things.
Finding a warm room came first, as this is not a cold-weather job. I parked the TAFE in Ruby’s garage and lit a fire in the box stove. Then I had at the offended frame with an angle grinder, finishing up with my random orbital sander and 40 grit.
An hour and a half later the shop was warm, so I gingerly brushed the primer onto both frame and glass. Heady fumes there, almost recreational, but nothing exploded.
Then came the polyurethane caulk which holds modern windshields in place. They had warned me that it takes 72 hours to cure fully. I vowed to give up the shop for that interval, though I noticed on the tube that it claims a 2-hour drive-away rating. The nozzle with the caulking tube had an unusual slit in one side. Dave explained that the nozzle leaves a triangular bead on the frame which the glass then squashes into place.
I broke open the seal on the caulking and tried a couple of squirts with the caulking gun. The stuff had the viscosity of frozen tar.
Not to be defeated by arthritic hands, I went to the wood shop and collected my pneumatic caulking gun and hooked it to Charlie’s big-ass air compressor. Bet turned it on and I signalled her to shut the motor off as soon as the black goo began to flow. Too much pressure would empty the expensive tube in a couple of seconds. The large air supply meant that I could caulk the entire window with only a moderate reduction in pressure. With my smaller compressor for a subsequent job I set the pressure to around 30 lb. to produce the same effect.
This tool cost a bit over $60. at Princess Auto. Its advantage is that it releases pressure instantly when the trigger is released. Cheaper models do not.
The bead went on nicely and held very well to the steel. At the last moment Bet placed a metal C-clamp on the bottom rail in what we hoped was the correct position to hold the weight of the window in case the caulk did not.
I set the glass on the clamp, tried to line it up, and pushed it up against the frame. It held. Bet placed a restraining hand upon it while I scampered up the step ladder to attach three strips of wide masking tape which I had previously set on the roof. They tightened up nicely and removed the risk of a crash. More bands of masking tape went everywhere, just to be sure.
The following morning everything had firmed up nicely, so I backed the TAFE out. If this window holds, I’ll replace two others.
Kubota B7510 in winter
February 12, 2017
Over the last week I’ve been up to my elbows in barn demolition, a massive, high-budget job. The excavator arrived Tuesday and worked until mid-morning Friday. The knoll below the barn foundation is now festooned with hewn 35′ ash timbers on display for buyers.
The rest sits in massive piles: crumpled metal shingles, hay and broken wood, barn boards, choice hardwood accumulated over 40 years, roofing boards, rafters, feeding racks, old hay, and so on.
My immediate job was to rescue as much of the hardwood as I could in the face of the onslaught of the excavator. Of course everything was icy, and my landing area was uphill from the work site. My two 35 hp tractors have implements on them and couldn’t tow. The ancient trailer-hauler, the Massey-Harris 30, wouldn’t spark.
In desperation I pressed the little Kubota into service. It starts very well in winter. Its 4WD system with turf tires grips surprisingly well on icy snow. With trailer-loads of lumber it needed low range to climb the hill, but balked only on one occasion with an overloaded 6X11 tandem. Turned out the Massey Ferguson 35, even with the help of sand, couldn’t get the load up the hill, either. I had to use the winch.
The icy surface the 21 hp Kubota had worked on routinely was more than a conventional 2WD tractor could handle. The short wheelbase of the B7510 and its hydraulic drive made complex manoeuvres much easier in the frigid north wind around the lumber piles. With assorted lengths on every load, I’d move the trailer between piles, leaving the little diesel to idle while I worked.
With an excavator on site it’s easy to maintain a rubbish fire: just start it up, reach over to a pile, grab a bucketful with the thumb, drop it on the fire. It’s a lot more work to do the same thing with a pair of gloves and a pitchfork. I’m reluctant to risk one of the loader tractors on the barn-floor burn area for fear of damage to the calcium-loaded rear tires. The Kubota’s non-loaded tires would be much easier to repair, if punctured. If I mounted the winch on it, I’d have pulling power, as well as a very rugged 5′ blade on the back. This seems a brutal job for the lawn mower, but one fall the little Bolens pulled a lot of cordwood out to the logging road. It couldn’t tow a log, but it would sit crossways on the road and winch with the p.t.o. quite effectively.
And now for something completely different:
January 31, 2017
The family pool vehicle is a 2008 Scion xB, purchased used from the Smiths Falls Honda dealership when we collectively decided that my mother’s beloved Honda CRV was too old for her to drive safely any more. Mom and I picked the car because it was the easiest thing on the lot to get into and exit because of its height-adjustable front seats. Very few cars for sale in North America have height-adjustable passenger seats.
The Florida-import posed a few difficulties for Mom in that the heater controls were counter-intuitive to an elderly person used to her Honda. Nonetheless, it was mechanically sound and she drove it until her eighty-eighth year.
Then the car became a pool vehicle, used primarily for ferrying Mom around, but also available when another family car was out of the country, broken down, or on loan to a friend. It had proven a favourite to leave in airport parking lots, for example.
Understandably, a machine this low on the depth chart would sit for considerable periods of time between uses. It’s always been pretty reliable. It needed ignition coils and plugs last year, but that’s been it.
But then it started to sputter when I was turning around after a visit to the Scott Island Ferry. Barely got home. Error codes blamed cylinder #3, then #2, Then 1, 2, 3 and 4, finally settling on 1 and 2. What the???
I went back to United Auto Parts in Smiths Falls where I had bought the coils and recounted my tale of woe to the guy in there who is both older and balder than me. I asked if there was some magic solution which would make the fuel injection system work, because I had no idea how to fix fuel injectors, and a new computer was too expensive.
“I use Sea Foam.” He walked over to a counter and handed me a can. “It’s very quick. Put it in and run the engine for ten minutes and see.”
I tried it and it worked. The Scion is restored to service again. I still don’t know what the problem was, but it was somewhere between fuel and injectors, and it’s better now. So I guess this is a testimonial to one of those products that line the shelves of parts stores which I have never noticed before.
Exercise in winter
January 20, 2017
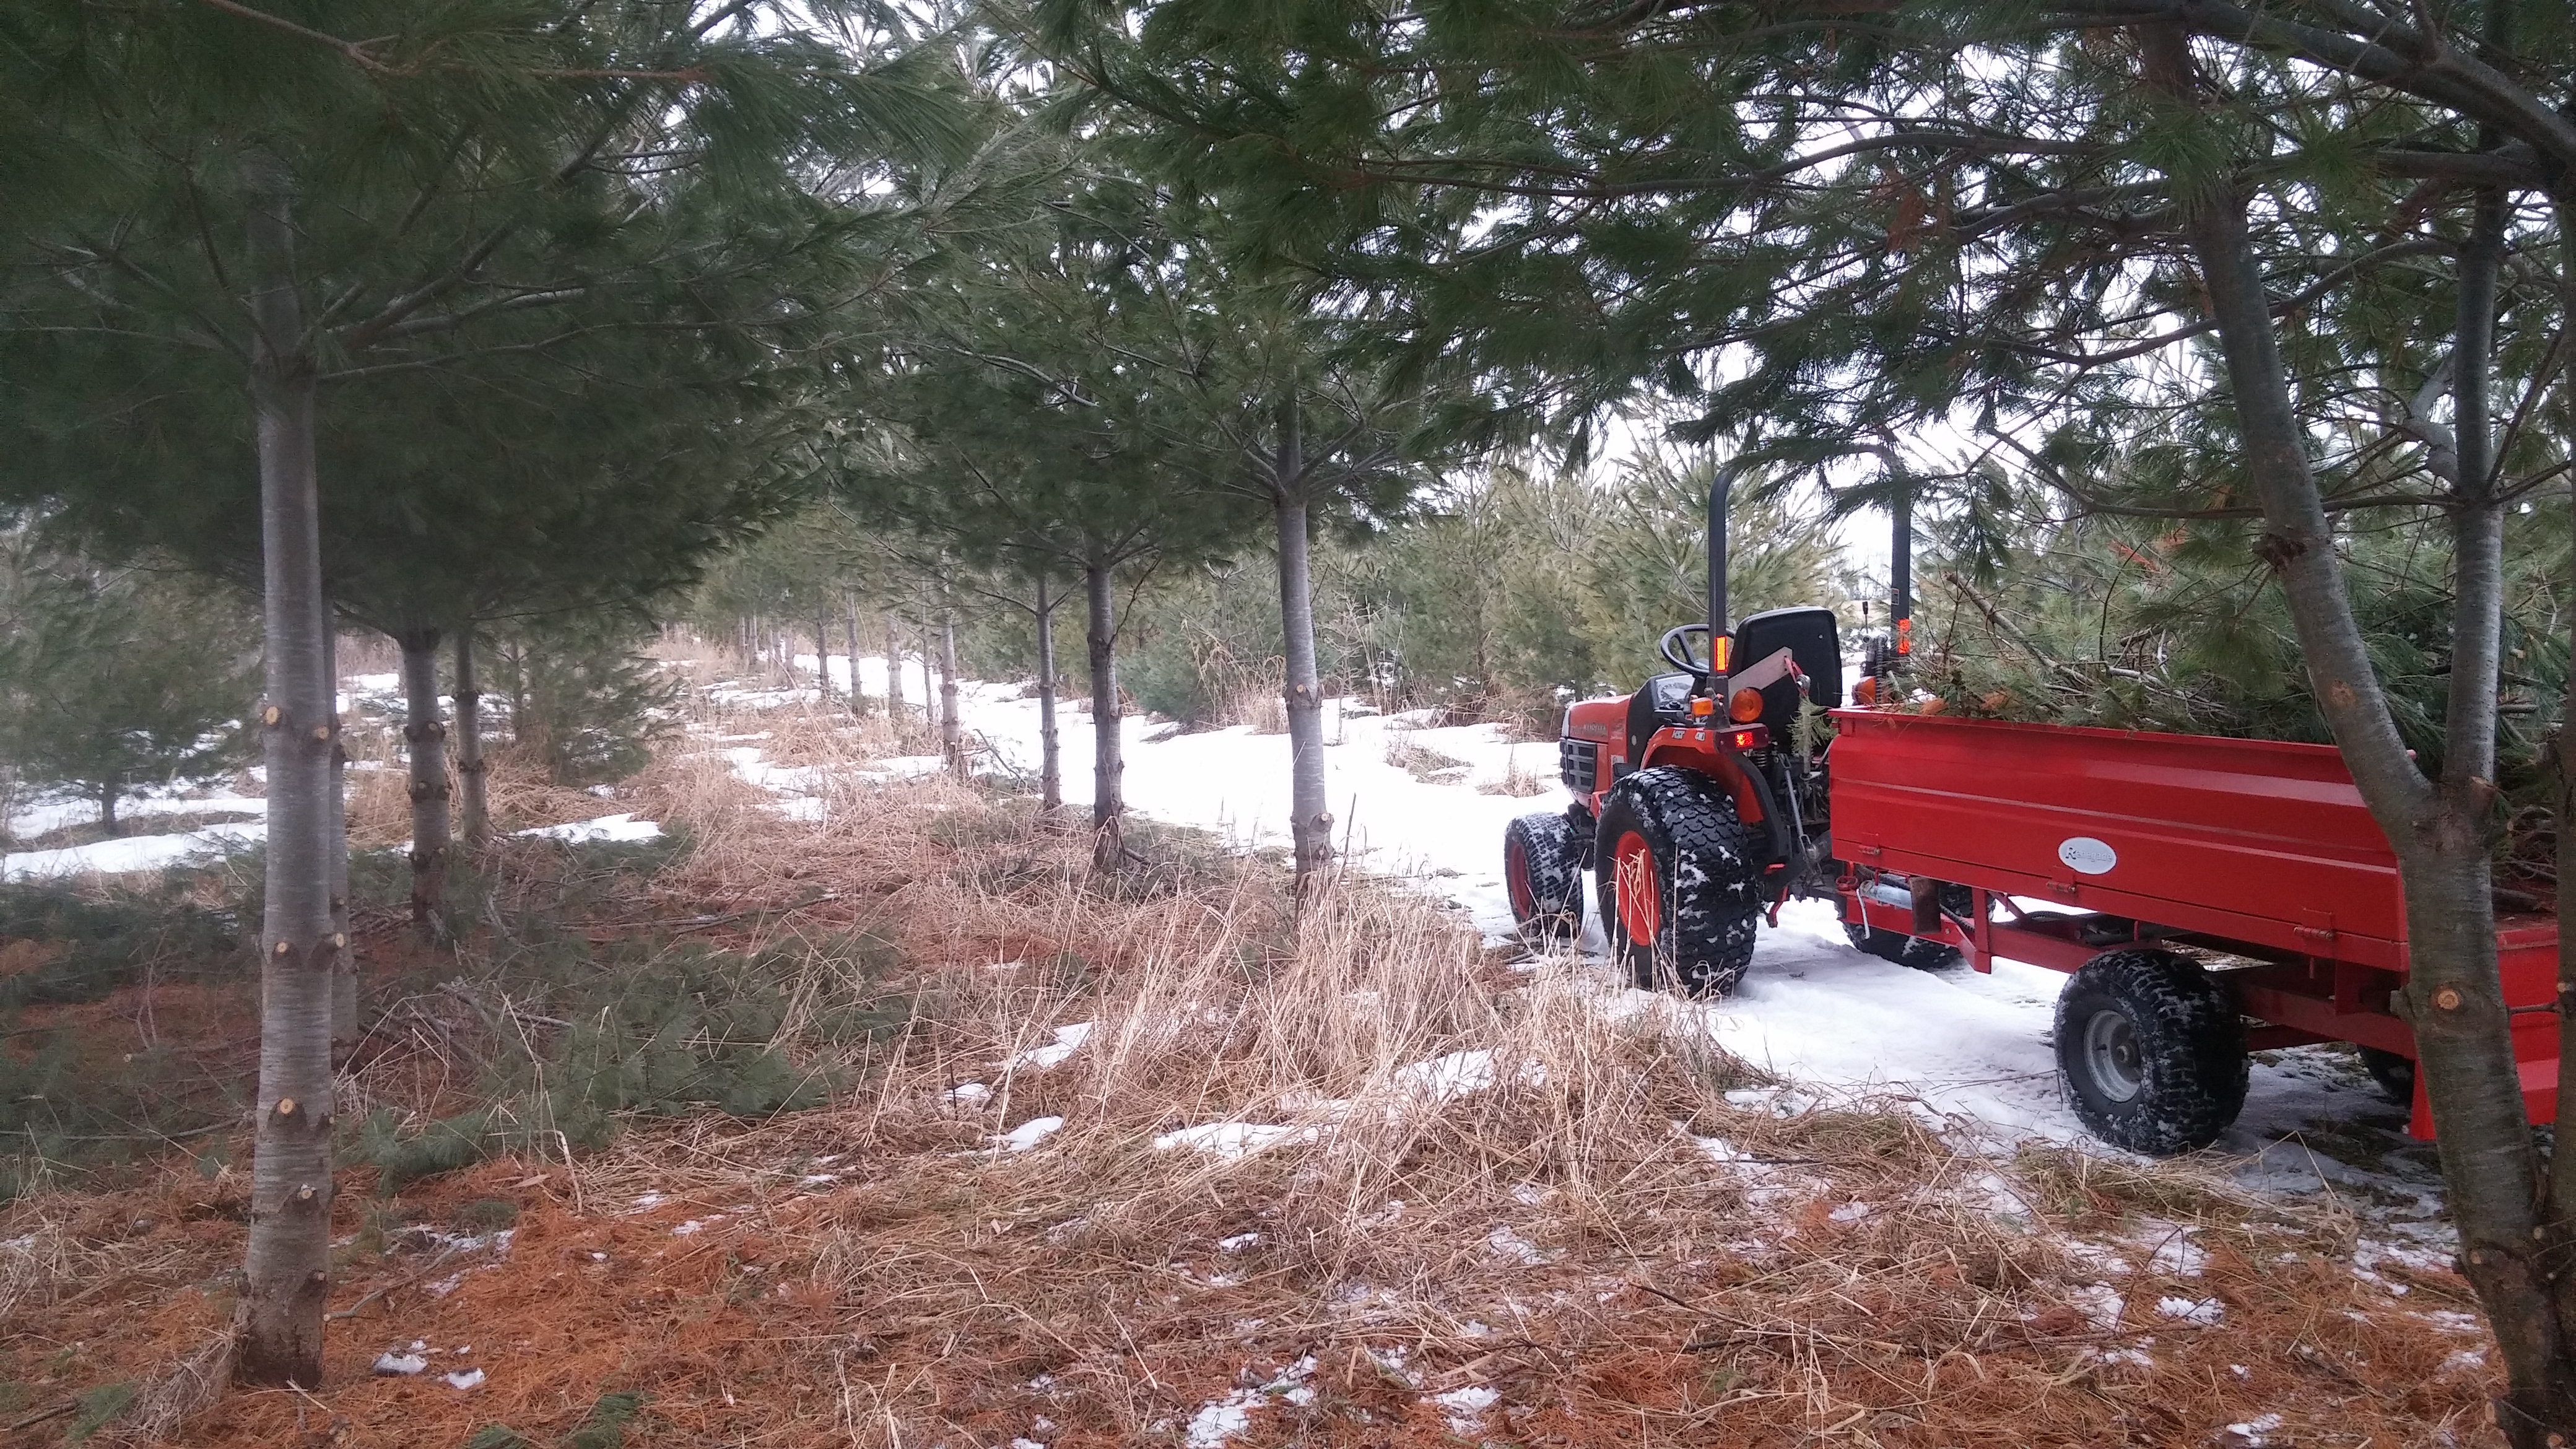
Today conditions were perfect for a bit of exercise, so I began to gather up slash left over from the trimming job on a stand of ten-year-old white pines.
Last fall a contractor offered the trimming in return for the pine needles which he sells in Toronto for wreaths at Christmas. The crew came back a couple of weeks later and dutifully trimmed the stubby branches off the trees, but I decided if I got a chance I’d clean up under the canopy so that I could mow it once or twice a year.
Five loads of branches transported to a burn pile were enough for today. If the weather holds I’ll get back at it. There’s little danger of running out of branches to gather in the near future: these rows are 700′ long.
Of course the best part is the unloading: just back up to the pile and flick a lever. The trailer dumps itself. A little overcapitalized? Maybe, but it’s fun.
Porsche Cayenne factory hitch a potential safety hazard
December 28, 2016
Today I ran into a case where Porsche over-engineering produced a potential safety hazard for the uninformed trailer user.
A Cayenne’s a logical choice to tow a 6X12 covered U-Haul trailer, but not until the rental’s safety chains receive an important modification. The hooks on the trailer I recently rented would not engage the rings on the factory trailer hitch because the steel is too thick to accommodate the triangular safety devices. Jamming the hooks into place wasn’t going to work, so I limped three miles to my shop from the rental depot by a back road. By then, one of the three chains had worked its way loose and was dragging.
I borrowed a pair of hooks from a robust trailer I built a few years ago. The photo shows them in place, pinned into links below the U-Haul hooks. I only had access to two hooks this time but from now on I’ll keep three which I can add on to safety chains to ensure that the robust hitch does not itself produce a hazard.
Update: 29 December, 2016
Grab the chain about 12″ from the hook, stick the CHAIN through the hole, loop the hook around the chain. This worked for me at UHaul.
Another RennList contributor used 3/8″ stainless steel quick-links to do the same job.
According to trailer veteran Tom Stutzman, Toyota has similarly robust hitch dimensions. Pennsylvania mandates simple S-hooks which fit easily. Ontario regulations require the problematic hooks.


