Adventures in the auto shop
September 21, 2014
This month has produced a series of adventures in auto repair. First came my young friend Sean Izatt on a Friday night with three friends to install a new exhaust system on his Subaru. The removal and installation went surprisingly well, considering that nobody had told Sean that he would need bolts to hold the thing together. We improvised and everybody learned useful things.
In my case I learned that manifold bolts aren’t rusted into the head the way they used to be, and in fact aren’t all that tight on a modern engine. So one can change an exhaust system without access to an ox-acetylene torch.
This knowledge stood me in good stead when the family Lexus started to growl soon after Sean’s visit.
With the hoist in the auto shop I didn’t seriously consider taking the car to the dealership for the job. When the Toyota parts guy confided that most dealership customers opt for off-brand exhaust systems I decided to give Walker a try, and ordered online from RockAuto.com.
In three days the exhaust system with gasket kit turned up at Wellesley Island Building Supply, the local Kinek outlet. I bought connecting bolts and washers at Baker’s Feed Store. With HST the materials for the project came to $673 CDN.
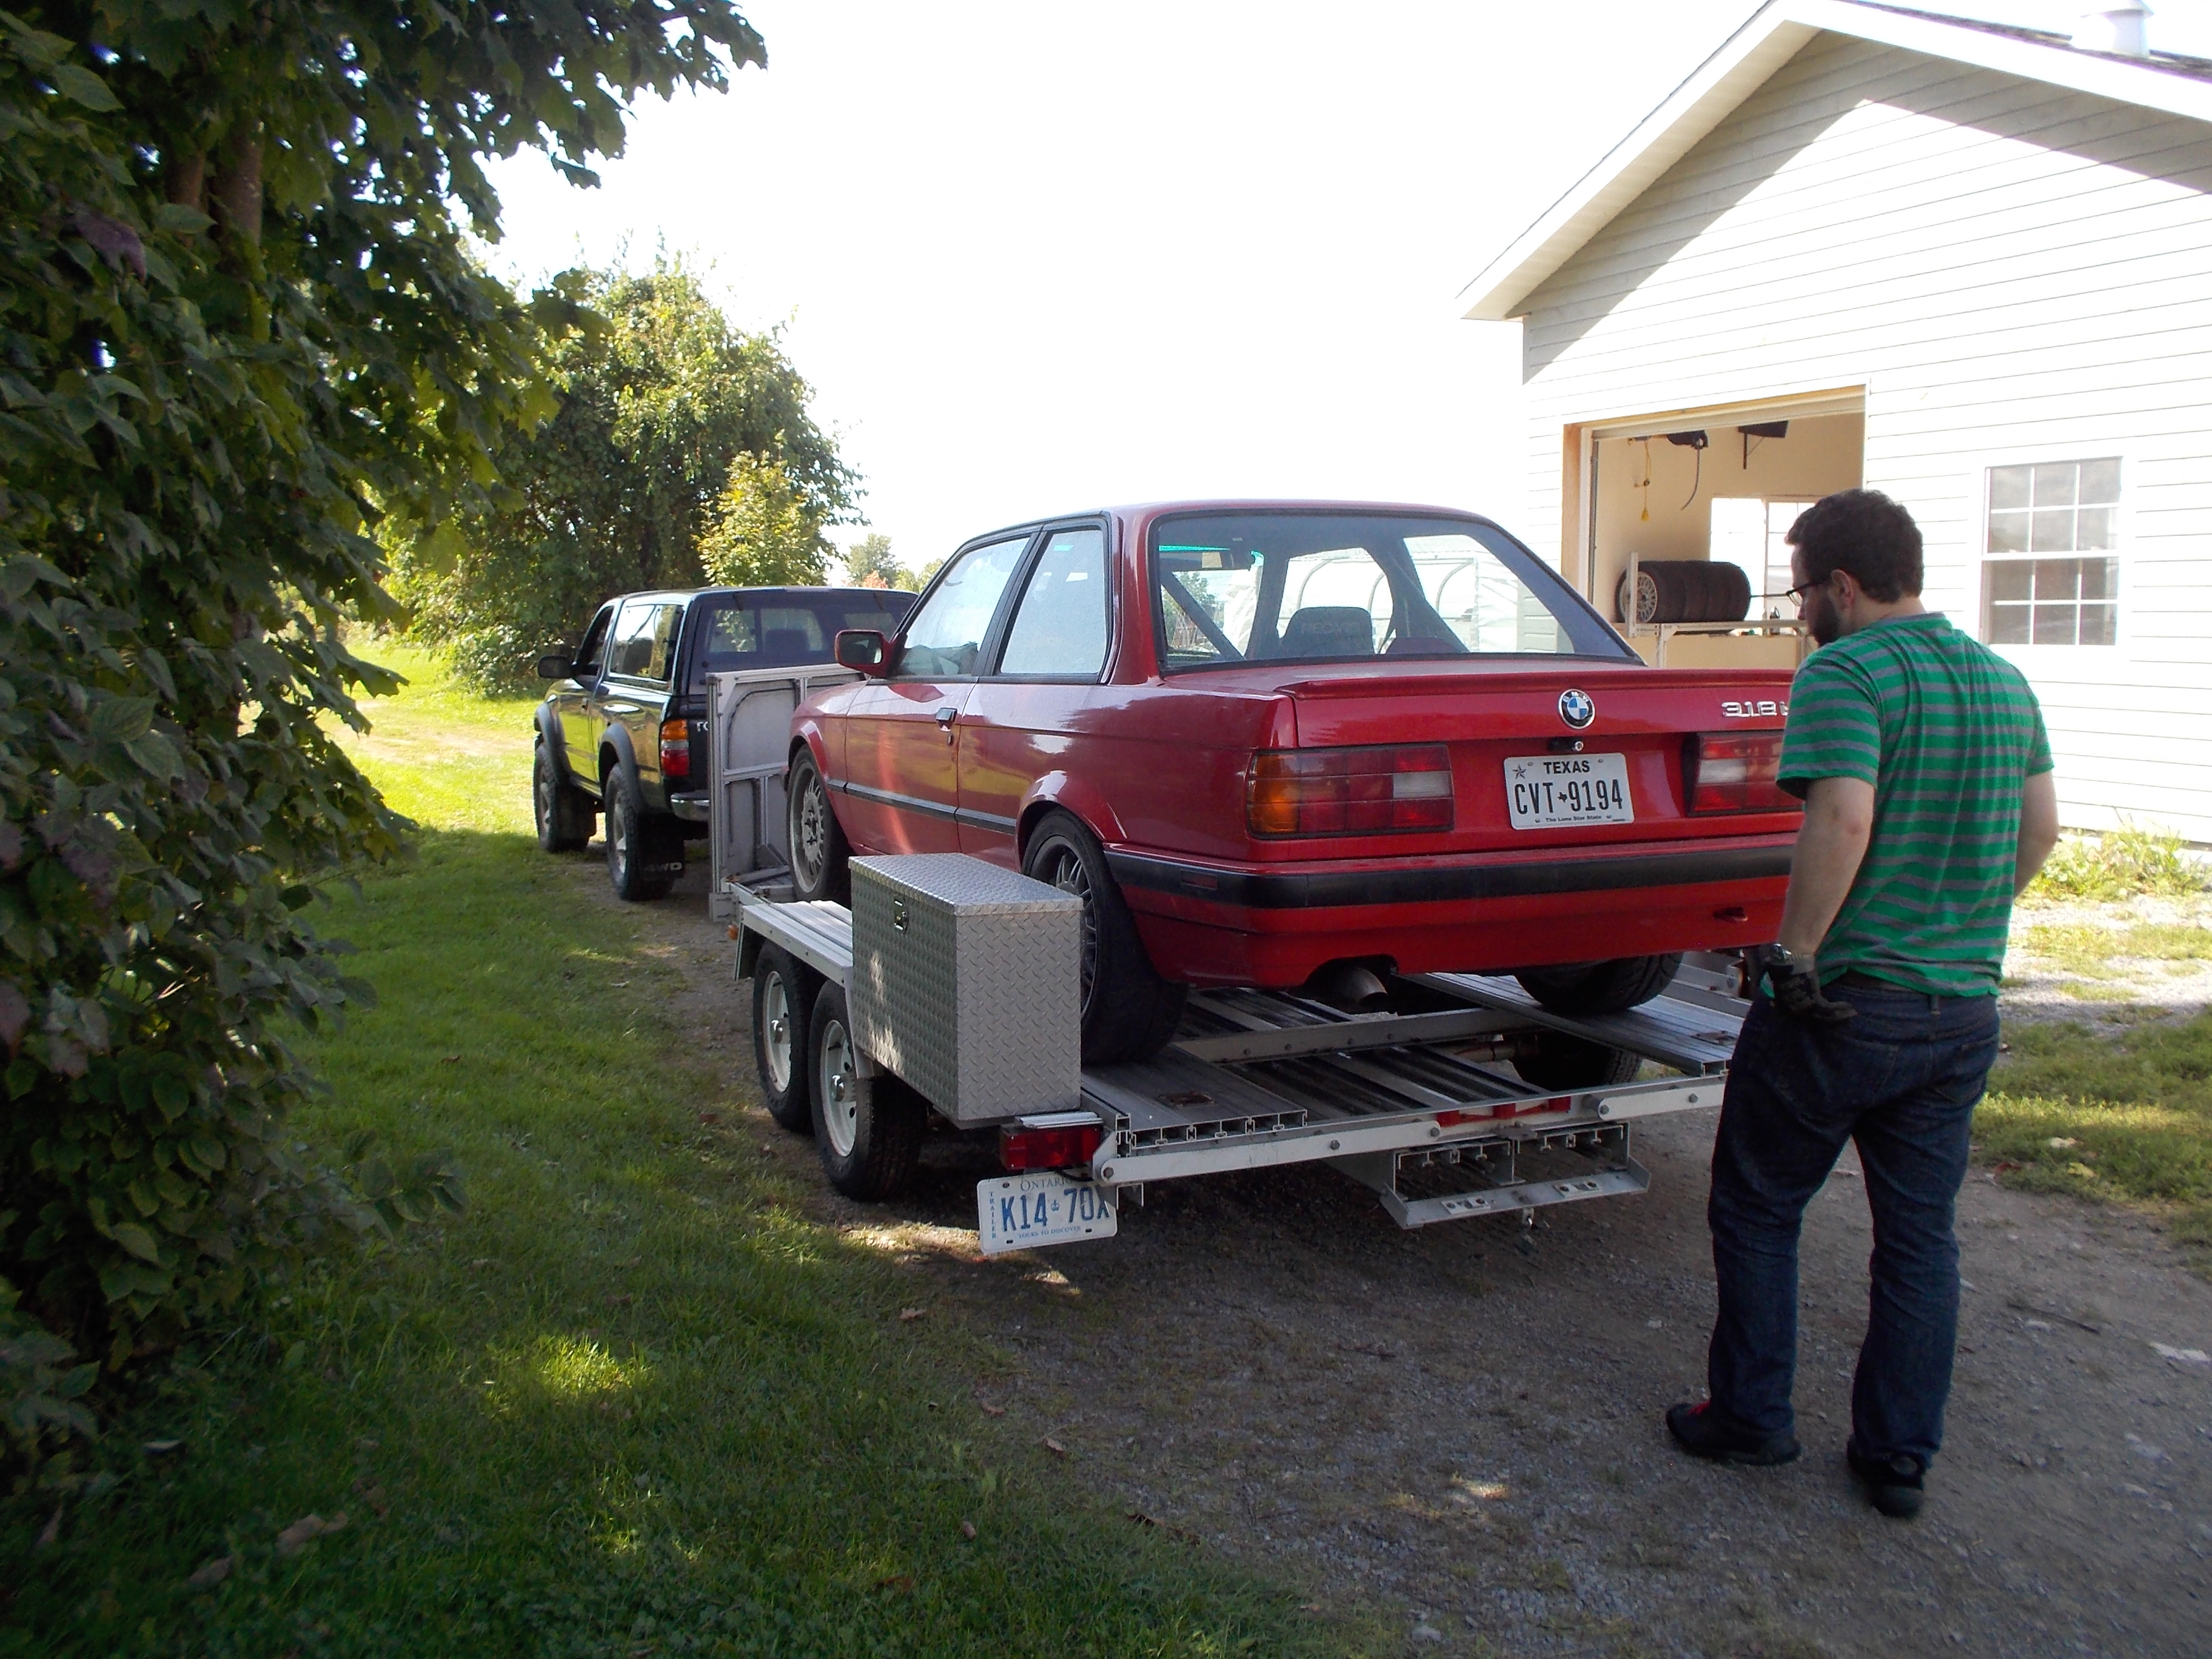
But while the pipes were in transit, Charlie arrived to collect a BMW race car he had bought in Austin Texas and had shipped to Watertown. This meant endless signal light repairs to two trucks and a trailer, as well as wiring my Tacoma with a brake controller.
When the driver backed the 1991 BMW 318 off the auto carrier it was covered with the accumulated grime of a four thousand mile ride, but it was clear that this is a quality machine built with the best of components. The paint job wouldn’t be out of place at a car show. It’s a very basic car, completely without upholstery except for the padding on the racing seats. No heater or cup holders here. No power steering, either. Engine bay space has been given over to a large straight six engine from a larger car. An electric fan pinned to the radiator pulls air through from the front. But every component seems to be the best that money can buy.
Charlie commented: “It looks like a low-priced runner built for someone with a hundred thousand-dollar car he doesn’t want to take to the track.”
Tom Stutzman and his beloved Tundra towed the Texas-plated treasure home to the farm.
The car had come with a history of coolant issues, so Charlie added a new, all-metal water pump and a new thermostat. Things didn’t go well until on Wednesday morning he found a blown fuse for the electric fan hidden under the wiring harness. With the fan in operation the coolant would stay in the radiator and not erupt like Vesuvius. A track session again became feasible, though with a very short timeline, so Charlie scrambled to get the car, my Tacoma and the trailer ready for departure Thursday evening for a long weekend at Mosport with the Porsche Club of Canada.
Early reports indicate that the BMW is a strong car, though an early report suggests that it’s hard work to drive it through the curves at Mosport without power steering.
Following three very successful days at the track the car went into the back corner of the garage and Charlie flew back to Vancouver, already designing the power steering unit he’ll install for next season.
Review: MFG 15 gallon spot sprayer from Princess Auto
August 10, 2014
I bought this rig to mount in the back of my Polaris Ranger because backpack sprayers were becoming a lot of work. In the first year it did a reasonable job around 8000 little trees, though I needed a driver for the Ranger.
As time went on the sprayer’s role changed to defender of the farm against invasive plant species, and in this role it served pretty well. A couple of tanks of Roundup mix per year did the job until wild parsnip moved in. I went at the parsnip with a vengeance and the sprayer continued to do its job with occasional repairs to the 12v outlet. I had to switch to a heavier plug because extended running would melt the little plugs.
Then came the current scourge of DSV (dog strangling vine) on a friend’s building lot, an intimidating mass of tangled vines stretching back into the forest. The pump delivered its load, but I melted a high-quality plug from sustained running.
I realized we need a longer hose to deal with this infestation as I don’t like disassembling the Ranger after every spraying session to ensure there are no seed pods hidden in its body.
The $129. sprayer has delivered yoeman service over five years with the only problems the power supply and an occasional hose connection coming loose. I wish it had a 50′ hose as an option.
Update 10 August, 2014:
This morning I grafted 50′ of beverage tubing to the hose and tackled the DSV anew. The load of 1% Roundup 3 weeks ago made it easier to move around in the infested area, but there was still more to do.
With the property owner handling the Ranger and the hose, I was able to venture deep into the jungle and kill stuff all of the way out while Les withdrew the hose and coiled it in the back of the Ranger in preparation for the next sortie. We sprayed two, 15 gallon loads in an intensive session where, among other obstacles, I had to belay down a ten foot embankment into a loose pile of logs hidden under vines.
Mosquitoes and deer flies had no use for me today. Roundup’s a good insect repellent, though I wouldn’t recommend it.
Kubota BX2350 first impressions
August 3, 2014
Tony’s new BX was in the way in my shop so I backed it out this morning, wiggled the bucket, and looked for something for it to do while it worked the grease into the forward/reverse foot pedal. I’d found the fitting under the floorboards after a look at the manual.
Before long the bucket found itself digging into a small topsoil pile, just to see how it carried stuff around. It filled nicely. I particularly liked the way I could see what I was doing throughout the process, even to the point of tipping the loaded bucket back enough I could peek inside. For someone who grew up on blind loader operation, this was a real treat.
Let’s see: where can I put a bucket full of choice topsoil? The BX took itself out the driveway in the general direction of two flower beds 500 feet away. With the speed this thing moves, is there any need for a dump trailer?
How about if I cover those rocks on the raised embankment so that I can climb up there with the mower? The BX moved in neatly, carefully avoiding the loose-stone flower bed enclosure and an irrigation tap peeking up through the sod. I dumped a useful amount of topsoil exactly where I’d planned, then zipped back up the lane for another, and another. Then I smoothed the black fill over the stones, leaving lumps. What if I took that stone out? It’s pretty big. Worth a try. The little 48″ bucket scratched away at the stone for a while, and then rolled it over. The boulder was too big for me to lift, but I could roll it easily into the bucket. The BX was game, picking it up without hesitation, so I hauled it 600′ to my stone dump and took another bucket of topsoil back to the site.
The topsoil worked into place well, using the bucket as a trowel. Then it came time to pack the surface on the steep slope. Up we went. When a front wheel came off the ground, the differential lock kept things moving, under control.
The BX stalled a couple of times when descending the steep slope* (see update). There seems to be a safety interlock which shuts things down temporarily if the tractor tips too far. I soon learned how to approach the slope so as not to disturb the interlock.
All too soon the little job was done and the topsoil pile showed signs of imminent depletion. The mid mount mower had been a passenger throughout this project, and interfered only when I tried to find a way between another stone wall and a dogwood bush. It was too wide to let me in. The high, flat elevation of the mower in travel mode is a considerable improvement over my B7510, which seems to want to drag its front casters around, no matter how I adjust it.
Wherever this remarkable little tractor goes, there’ll be dump trucks full of fill and topsoil not far behind. The BX2350 and its loader are a highly addictive combination.
Update: 21 August, 2014
*I should mention that my friend’s wife found one little glitch in the BX’s setup. Whenever she pressed the forward pedal the machine would cut out. Seems she’s not all that heavy, and the spring under the seat to control the operator presence sensor was a double layer of spring steel. On Tractorbynet I found a discussion about this and the solution: remove two, 12mm studs, take off the top spring, retighten. Worked fine, once we found a socket set which would break free the studs without twisting them off.
That minor modification completed, all was well with the BX.
The generic bush hog (updated, with retraction)
August 1, 2014
This review is the product of seven years of mowing 25 acres of tree seedlings on our property. After wearing out a Walco 60″ rotary mower inherited from my dad (replacing one set of blades and three gearboxes), I bought a new 60″ Rhino to run on my 35 hp TAFE tractor but discovered that many of the rows in the new plantings were too narrow for the 5′ 6″ tractor to travel. So I bought a 1980 Bolens G174 with a track of 38″, 4WD, suitcase weights, a 17 hp diesel, and a separate overrunning clutch to cope with the the Braber’s flywheel effect. A 48″ Braber rotary mower mounted neatly onto the 1200 lb tractor and I gained easy access to the shrinking rows between the trees.
The Braber 48 likely had about 200 hours on it when last summer I demolished the gearbox by bellying onto a rock. The bottom of the gearbox casting sheared right off. Braber replaced it under warranty, but I had to do the mechanical work myself. Regardless of lubricant choice the new gearbox is too noisy and damages my hearing, even with earmuffs. I can’t see going deaf to that racket for another ten years, so I’ll probably buy a better mower soon.
But accidents happen, and maybe the replacement was a lemon. My real beef with this mower has to do with its gear ratios. The Bolens G174 has 3 pto speeds, and I chose the middle gear which provided 750 rpm at the shaft. This worked well. But then I bought a much newer Kubota B7510HST with a 540 pto. This produces a lousy cut in long grass with this mower. The 5′ Rhino’s cut is vastly superior.
So I looked at some parts manuals. There are two 40-45 hp gearboxes available, a 1:1.4 ratio, which this one is, and a 1:1.9 ratio* which would likely work well on my Kubota. (Big mea culpa here: the replacement gearbox is a 1:1.9 model.)*
So if you have a small tractor with a 3 speed PTO, select the middle gear and this model will do you well. If you have a more modern tractor and want to do a lot of mowing, find a mower with the 1:1.9 ratio or get a 60″ machine. The tip speed just isn’t there for a fine cut unless you turn the shaft more quickly than 540 rpm.
This morning I shattered a blade on another rock and was pleased to find that TSC USA stocks them. Tuesday with any luck I’ll slip across the border to Ogdensburg and get the parts I need.
Update, Sunday, 3 August, 2014:
A lull in the action prompted me to head off for Ogdensburg and pick up the 3″ X 18″ blades they had in stock. There was a set of 3 1/2″ X 18″, but the box didn’t look that wide. I opened it up. Two 3″ X 1/2″ X 18″ looked back at me. What’s a little typo on a box between friends, eh?
As the surviving original blade measured about 17″ and the replacement was 18″ at the same point, I had bought the blades on the assumption that I would have to cut an inch off them. The saw was all set up before I examined the dead one more carefully. Though the metal was dark and smooth, it didn’t look as though I had been at it with an angle grinder, and I had done a lot of sharpening on those blades over the years. Seems the rock strike had broken one blade in two; the other had lost an inch off its end in a very precise split, as well as bending all out of shape.
I had bought the correct blades after all. They fastened right on with the bolt kit on the shelf beside the blades.
I found the Ogdensburg TSC quite an impressive store with a smart, helpful guy on the service desk.
The much-maligned Brader 48″ rotary mower may again see service> If the blades work well I may just replace the noisy gearbox with a 1:1.9 model. (See above).
UPDATE: August 5, 2014
The rotary mower had to be readjusted to allow for the larger offset of the new blades. I raised the chassis of the cutter an inch and adjusted the rear wheel and chains at the front until it cut properly, if producing a somewhat taller cut than before with the old blades.
As soon as the paint wore off the blades, the cut improved immensely over the old blades. It wasn’t just sharpness. The old blades, I am convinced, had been banged out on a forge by a blacksmith who had no concept of how the things were supposed to work. The sharp part of the blade was on the high side of the twisted blade, not the lower side. Instead of sucking the hay up to the blades, the old blades blew it down after cutting it.
So now the mower cuts much better than before. It is also quieter and more agile in conjunction with the tractor in its taller stance: the rear wheel pivots much more easily.
I feel I may have mistreated TSC in my review of their 4′ rotary mower in that I ascribed failings to their model which may well have been the result of bungled blade construction by a competitor. In the review I rated the generic machine a 3/5 when 4/5 would have been more appropriate. The TSC blades and bolts were fine, at least before their first encounter with a rock.
UPDATE: 28 January, 2015
In retrospect, I realize that the problem with the blades is that they are made of soft steel. An impact with a rock will bend the blades up. Repeated impacts will result in the reverse-shape I have referred to above.
The conclusion from this, I guess, is that the Brader machine with its low-carbon blades is a decent grass-cutter, but if the machine sees rough use around rocks, the owner should be prepared to replace the blades with a new set. At $58. per pair at TSC (USA), the price is not exorbitant.
I should also remark that the replacement gearbox on the Brader has gradually grown less noisy, though it’s far from quiet. One tip for anyone replacing the gearbox on this model: bolt it on with the nuts up, rather than down. Then if one or more nuts come loose on the unit, the change will be immediately obvious to the operator, and with a little luck can be tightened up immediately with a wrench, instead of requiring the disassembly of the machine to re-tighten the bolts.
People who stare at screens (updated)
July 24, 2014
“Does anyone plan to stare at their phones some place exciting this weekend?”
This comment which I read on an online comic strip this morning could only have been written in our current era. The telephone has morphed into a device which has immobilized much of our brains and corrupted our language. In particular it has savaged the rules of English grammar, invalidating the specific references created by proper use of pronouns. But if one can broadcast every narcissistic impulse to the entire cyber-universe as soon as it occurs, why bother to distinguish between the one and the many, between her and their?
I blame the daycare generation for the increasing reliance upon “their” as a grammatical crutch. In a universe of interchangeable people, why value one particular friend beyond the convenience of shared toys? Why bother to keep track of who is who when “they” is easier?
Conversations with graduate students over the last few years have increasingly become punctuated by Google quotes. In fact it wasn’t at all uncommon for the four or five people in the room to have MacBooks, iPhones or Galaxies open while they chatted. Mind you the conversations delved far more deeply into topics than they used to, and this alpha male’s recourse to B.S. when the facts ran out has been dramatically reduced by fact-checking family members. But a good memory for details seems no longer to be required. If I can’t remember an actor’s name, for example, all I need do is look up the cast list from a remembered movie or T.V. series to get the information.
Perhaps the ultimate manifestations of the dominance of the smart phone came during a visit to our son in Vancouver this spring. He had located an Italian restaurant online and led Bet and me off, Pied-Piper-style, while he brandished his Galaxy in front of him. We walked for a long time, but each complaint received an “Only a couple of blocks more!” response until eventually we arrived.
As we sat down Charlie blasted off a quick text message. An answering beep informed us that Roz had left work and was already on a city bus, converging upon our new location. She skilfully planned a route through the maze of Vancouver streets on her phone, and twenty minutes later she casually strolled up to our patio table, Galaxy still in hand.
A day later when we hiked up the side of a mountain and I ran out of wind halfway up, Roz whipped out her phone, called up a picture of the summit, and playfully suggested I photograph it to prove to Bet and Charlie that we had made it to the top. So it’s little wonder Parks Canada has introduced Internet service on their properties. Today’s citizens see no reason to cut themselves off from the Internet while they enjoy their lives.
While today’s denizens of the western world may appear to stare blankly at phones and laptops for long periods of time, they don’t get lost much, have continual access to good information, and get to enjoy live videos of grandkids, if they have any. What’s more, I have built and installed four flights of stairs for friends’ homes this summer and they all fitted perfectly, thanks to a $13.00 spreadsheet I downloaded to my MacBook Air.
One of my favourite screen-starers, Dr. Martin Mallet, did this interview recently:
Normally I keep the black walnut fields carefully trimmed, but this year I have a lot of younger seedlings and so I decided to let the two four-acre fields fend for themselves. Some are now bearing, so they’re hardly tender shoots any more.
But my wife complained that her favourite dog walk had become “spooky” with the dense hay growing between the trees. This new worry might have something to do with the large black bear we saw on the property earlier in the spring.
Anyway, I made good progress with the TAFE on the 5′ Rhino, but only down the centre of the aisles. With its ROPS, sun cover and loader, the 35 hp field tractor is now too cumbersome to work around the rapidly growing and brittle branches.
I had already put a couple of tanks through the Kubota trimming around 15,000 younger seedlings with the 48″ Braber rotary cutter. As long as the grass wasn’t too long it did a good job. When I tackled a one-acre plot of hay running rich to wild parsnip, however, it did a lousy job. The wide turf tires flattened about a quarter of the hay and the blades tore up the rest. At the time it didn’t look too bad, but five days later I couldn’t stand the mess any more and re-did the job with the Rhino on the TAFE.
Up until now I have blamed the crappy, off-brand 48″ bush hog. The blades seem shaped improperly on it, pushing the grass (and rocks, I suppose) down, rather than drawing up. (See update below).
With its ROPS the Kubota is too high for work under trees, so today was the turn of the Bolens. Normally I use 1st gear HI for mowing, but the hay was too heavy. We crawled around under the trees in 3rd LO with the PTO in 2nd gear. The “crummy” mower did a surprisingly good job.
If the increase in pto revolutions from 540 to 750 produces a major improvement in cut, could it be that 48″ mowers turn too slowly with a standard, 540 rpm shaft? Simple geometry would suggest that the same gearbox used on a 4′ and on a 5′ will only deliver 80% of the tip speed on the smaller chassis.
The 5′ mower produces an effortless cut. Until now I have attributed it to the high-priced components in the Rhino. But if I were to buy a 48″ Rhino, would it still produce only 80% of the tip speed of the 60″? (Again, see update below).
UPDATE: 29 July, 2014
I looked up gearboxes for Rural King rotary mowers. They list two 40 hp gearboxes, one geared to produce a final drive speed of about 750 rpm for 5 and 6′ mowers, and the one for the 48″ mower geared to spin at 1000 rpm. So a good 48″ rotary mower won’t have the same gear ratio as a good 60″. (Turned out the Braber mower has the correct 1:1.9 gear ratio. The label on the gearbox makes that plain.)
UPDATE: 14 August, 2014
I found that TSC in its American stores stocks replacement blades for the Chinese rotary mower under their proprietary brand name, so I replaced my broken blades. The contour of the new blades looked great, though they still looked as if they had been shaped and sharpened by a blacksmith. Initially they did a very good job, causing me to rethink my complaints about the mower. It was even somewhat quieter with the new blades. Perhaps that grinding sound from the gearbox was blades out of balance?
Today I discovered a 3/4″ nut and washer in the chaff I cleared off the deck of the mower. The shear pin was about to give up. A new one installed, I checked the blades. They’d had a couple of hard days mowing the worst three acres on the farm, and I discovered the problem with these blacksmith-sharpened blades:
A normal rotary cutter blade is very dull. It has a steep angle and blunt edge. The Chinese blade has quite a sharp angle. An impact on the cutting edge of the blade seems to bend it upwards. Repeated impacts produce a blade that looks like a snaggle-toothed propeller designed to push the grass downward. Perhaps they use soft steel so that the blades don’t shatter when they hit a rock.
That was why this morning I had noticed the cut on short grass was no longer very good. The other revelation was that my theory about tip speed was out to lunch. The gearbox is clearly labelled a 1:1.9 ratio. The 48″ mower has the same tip speed as a 60″ mower with a 1:1.4 gear ratio.
So I pulled the back end of the cutter up and went at the blades with an angle grinder. There’s no way to restore the contour of the blades by grinding. The best solution will be to replace the $54.00 US blades with a new set. That’s not such a bad idea.
Changing the hydraulic oil on a Kubota B7510 HST
June 15, 2014
I just finished changing the hydraulic oil in the Kubota B7510. It’s quite a job. I’m told HST machines live or die on the condition of their oil, so it needs doing every 300 hours. The previous owner told me he had changed it just before I bought the tractor at 210 hours, but he apparently went by the manual and only changed the single filter mentioned there. That filter handles the lifting hydraulics. The other one (which the manual seems to have forgotten) handles the hydrostatic drive (HSD) It’s the one which gets all of the use on my machine, and it still had a factory black filter at 370 hours.
To judge from a lack of particulates in the oil and no evidence of metal filings anywhere, everything turned out to be in top condition, but to determine that I had to drain 11 litres of oil from the transmission case (from 6 different orfices: 6 potential leaks) and then pour new oil back in until it was full. The parts guy said its capacity is 13.4 litres, so he sold me 15. The manual said 13.4 litres for a B7510DT, but this one (HST or HSD, depending upon context) needs 15.3. It took 11.
The tough part was the strainer everyone warned me about. It’s a 26mm nut, factory-tightened very tight. Very few garage socket sets contain a 26mm socket, and none of the wrench sets do. I almost rounded the nut with a 27 mm socket when I removed it. Out the long, skinny cylindrical screen came, attached to the nut. I washed it, but it wasn’t dirty. I couldn’t find any metal fragments in the strainer, but the learning curve was a bit steep when I set out to replace the strainer. Eventually it went in easily if I lay directly beneath the assembly at the bottom of the transmission. This was not a bolt I could put in by feel alone.
I plan to check this strainer regularly from now on — about every 1000 hours.
The new, higher-quality oil from the Kubota dealer seemed to make the tractor quieter, and likely smoother. I’ll know better after a few hours of work. Update, 15 June: It’s certainly no quieter with the lighter premium oil, though everything seems to work well.
In retrospect, changing the HST oil was a messy job made tedious by the risk of a leak, but things went together quite well once I’d figured out how to do it.
A commenter on the Kubota page on Tractorbynet just told me that I missed one drain. That would account for the 11 litre drain and refill.
Next up is the front axle lube change. The same guy said that his machine weeped oil at the seals with the lighter oil, though it’s fine since he went to 90W gear oil, so I’ll try that.
Update: 19 December, 2016 When last fall I eventually drained the front axle lube, it was dark and burned-looking. I felt quite contrite about the oversight. The axle’s fine now, and properly filled.
DIY brake job(s) on a 2008 Scion xB UPDATED
April 19, 2014
When her beloved Honda CRV became too old to drive safely on the highway my mother needed another car with easy access. The best we could find at the Honda dealership was a 2008 Scion xB from Florida which offered height-adjustable front seats and wide doors.
The Toyota controls on the air conditioning and lights were a chore for Mom to learn in her mid-eighties, but the rest of the car was just fine. Two years later the brakes had begun to grind, so I put it up on the hoist and took it apart.
After the wheels were off I realized that nothing looked familiar in there, so I took to You Tube for instructions. Disk brakes have come a long way since my all-too-frequent encounters with them on my 1979 Rabbit, but now there are lots of guys who demonstrate simple procedures on their websites.
On the Scion xB the caliper is separate from the part that holds the brake pads. On the fronts the holder hinges up for convenient maintenance if you remove the lower bolt.
The big problem with the rear calipers was that no amount of clamping pressure would make them retract, though the pins holding the brake pads were fine. Online I discovered that the emergency brake linkage holds the pads in position, so the piston of the caliper must be rotated clockwise under compression to get it into position for new pads. Charlie emailed me that Princess Auto had a tool for that on sale this week, a dice-shaped, hollow metal box with pins sticking out of it. After much fussing with C-clamp, hammer and screw driver, I learned to fit a 3/8″ socket extension into the appropriate slot on the new gadget and twist away.
I looked online for brake parts. None of the usual Canadian suppliers carry Scion brake parts. I phoned a Toronto-based eBay brake parts vendor. She firmly told me that 2008 Scion xB’s have drum rear brakes. Oh. Another told me the same thing. So much for the $200 brake job.
Toyota brake parts are usually pretty reasonable at the dealer, so I called Kingston Toyota and asked. The parts guy wanted a VIN number. I recovered 16 of the 17 digits from a liability slip in the glove box and his computer provided the rest. “Is it black?” he asked, by way of confirmation.
Another reason I was willing to pay four times the lowest Internet price for pads and rotors for this car was that the pads when I took them out seemed to have been jammed into the holders, unable to move. I suspected either a fit issue or crummy workmanship at some point. There was no need for Toyota brakes to fail in two years of light driving.
John had to order the rear rotors from Toronto, but assured me they would be in the following morning, so we planned a trip to Kingston to pick them up. For the $601 (including tax) John threw in two tubes of grease and a session with a technician who explained to me how to lubricate the pads in their slots so that they would work smoothly. Then he carried the rotors out to the car for me, and away we went.
By email I asked Charlie if the pins really needed to be re-lubricated if they were flexible under their rubber seals. He assured me that they did, but after I greased one with the special lubricant the dealer gave me I had trouble getting the rubber thing to seal again, so I left off for fear my clumsy fingers would do more harm than good to the other pins. Charlie’s done a lot of brake jobs on his track cars, but they were Porsches, and Porsche brakes go together very easily. Scion brakes don’t.
All in all the reassembly went pretty well. I had to figure out how to wiggle the pads into the holders so that they could move. Otherwise they’d jam. The lubricant and a goodly amount of elbow grease freed them up, but I still don’t understand why these little clips fit onto the bottom of the front pads. There weren’t enough to go around, so I put two on the left side and left the right ready for clip installation if they squeal or thump.
Apart from the pad-fitting the front brakes went together well, but the rears required that I remove the calipers in order to mount them on the rotors. No problem: Charlie’s tool box has two sets of vice grips for pinching brake lines, and banjo bolts are no big deal if you don’t lose the washers when you remove them. “Gravity bleeding” was mentioned on one of the videos, and it seemed to work. I added a few ounces of brake fluid at the top and wiped up the mess on the floor.
The car stops well now and the ABS works properly. With the summer tires installed (tire pressure sensors) no indicator lights complain on the dash. The parking brake works properly. The car shows no evidence of brake drag, but when I took the temperature of the rotors after a test drive, the right rear was a bit hotter than the others. That caliper had felt a bit tight when I put it together. It may need replacement.
I’ll try a couple of test drives and see if it loosens up with wear. Now that I know how to reassemble a set of modern disk brakes, the prospect of another session on the hoist isn’t bad at all.
BTW: I see this article is already getting some hits, so I should mention a trick I learned from a mechanic some years ago. Toyota brake rotors don’t flop loose from the hubs when the wheel comes off. There is, however, a pair of tapped holes drilled into the rotors which take a regular bolt, metric thread, a bit bigger than 1/4″. The correct bolt takes a 12 mm wrench, if I recall correctly. To remove the rotor, all you need do is locate a suitable bolt and twist it in against the hub. Pop. Works every time. Paint the bolt and keep it in your toolbox.
UPDATE: 20 April, 2014
After considerable thought, a downloaded service manual and email chats with Charlie, I went looking for the source of the friction on that right rear caliper.
There didn’t seem to be a lot of run-out on the rotor, though the pads had worn themselves looser than when I had forced them into place before.
Before long I found myself removing the piston from the caliper by turning it counter-clockwise with my little caliper tool and a 3/8″ ratchet. It felt as though some lube could help. When the piston came free I discovered a few bits of broken thread on the stud inside the caliper. I cleaned things up as well as I could, tried air to blow any remaining moving parts out onto the bench (there weren’t any), then buttered things up with the synthetic grease the dealer gave me and put them back together. The rubber “foreskin” of the piston was hard to get back in, though with persistence and the back of a dental pick I think I prevailed. Several trips in and out (with ratchet and tool) and the piston seemed freer than before. On a dry fit I noticed that it’s fairly easy to extend the piston in the caliper by judicious manipulation of the emergency brake lever (where it joins the cable at the wheel), though it’s wise to avoid pinching the web between one’s thumb and first finger during this exploratory exercise.
Little then remained but to torque the lug nuts and try a gentle test drive. My laser thermometer read 120F on the right rear rotor vs 100 or so on the others after the drive. But the gas mileage is back up on the digital display and there’s no puddle of brake fluid under the car, so I hope that the caliper has somehow become third-time-lucky.
UPDATE: 24 April, 2014
After several local expeditions to check local ice conditions, I have concluded that the brakes on the Scion are now considerably better than those of the other vehicles in the fleet, so this missive ends.
UPDATE, 30 June, 2017
After what seemed a short interval since the last brake job, but much time sitting idle combined with intermittent winter driving, the Scion xB’s rear callipers were seized and noisy. Braking performance had deteriorated significantly, so it was time for a session on the hoist. This time I would replace all components and hope for a better fit on the components.
The Toyota guy told me he would have to order new rear callipers from California at $445 each. No rebuilds were available. Rockauto.com still had them listed, so I ordered callipers, upgraded rotors, and bargain pads from the online vendor. But they cancelled one rotor as they were out of stock of that model. Then the trouble began. Rockauto has such an efficient website that I had never tried to ask a question before on many orders. It hit its limit when I tried to cancel the second rotor in order to get both from a single warehouse and reduce shipping costs. The cancelations, additional charges, refunds and delays made me wonder if cross-border online auto parts purchases may have had their day. To their credit, the faceless workers at Rockauto ended up shipping me all of the correct parts, and they all made it through to the bemused clerk at the Kinek outlet in the back of the Wellesley Island Building Supply, but at Canadian Customs all I could do was hand the agent the stack of invoices and declare that I had paid $631 US for the pile of boxes in the back seat.
If you are cross border shopping online, always get the invoices in U.S. funds to avoid hassles at Customs. Agents assume prices are U.S. and automatically calculate the exchange rate to Canadian funds before adding the 13% H.S.T. On a previous trip I had a clerk become quite annoyed at having to re-calculate the sales tax when I pointed out the obvious disparity in the numbers because the major item had been invoiced in CAD.
The new components went onto the Scion quite easily in comparison to the battles I had had with the old rear callipers. The rears still proved difficult to adjust, though. Then I couldn’t get the pedal to firm up, despite repeated bleedings. After a test drive the right rear had brake fluid on it when I took it off for a final inspection: a leak! New washers on the banjo bolt, a wipe-off of the tire and wheel, and the Scion was finally ready for return to duty in the motor pool.
During their short market run, Canadian Scion xB’s had rear drum brakes. Thus equipped they gained a reputation as highly reliable and economical cars. Drums last almost forever.
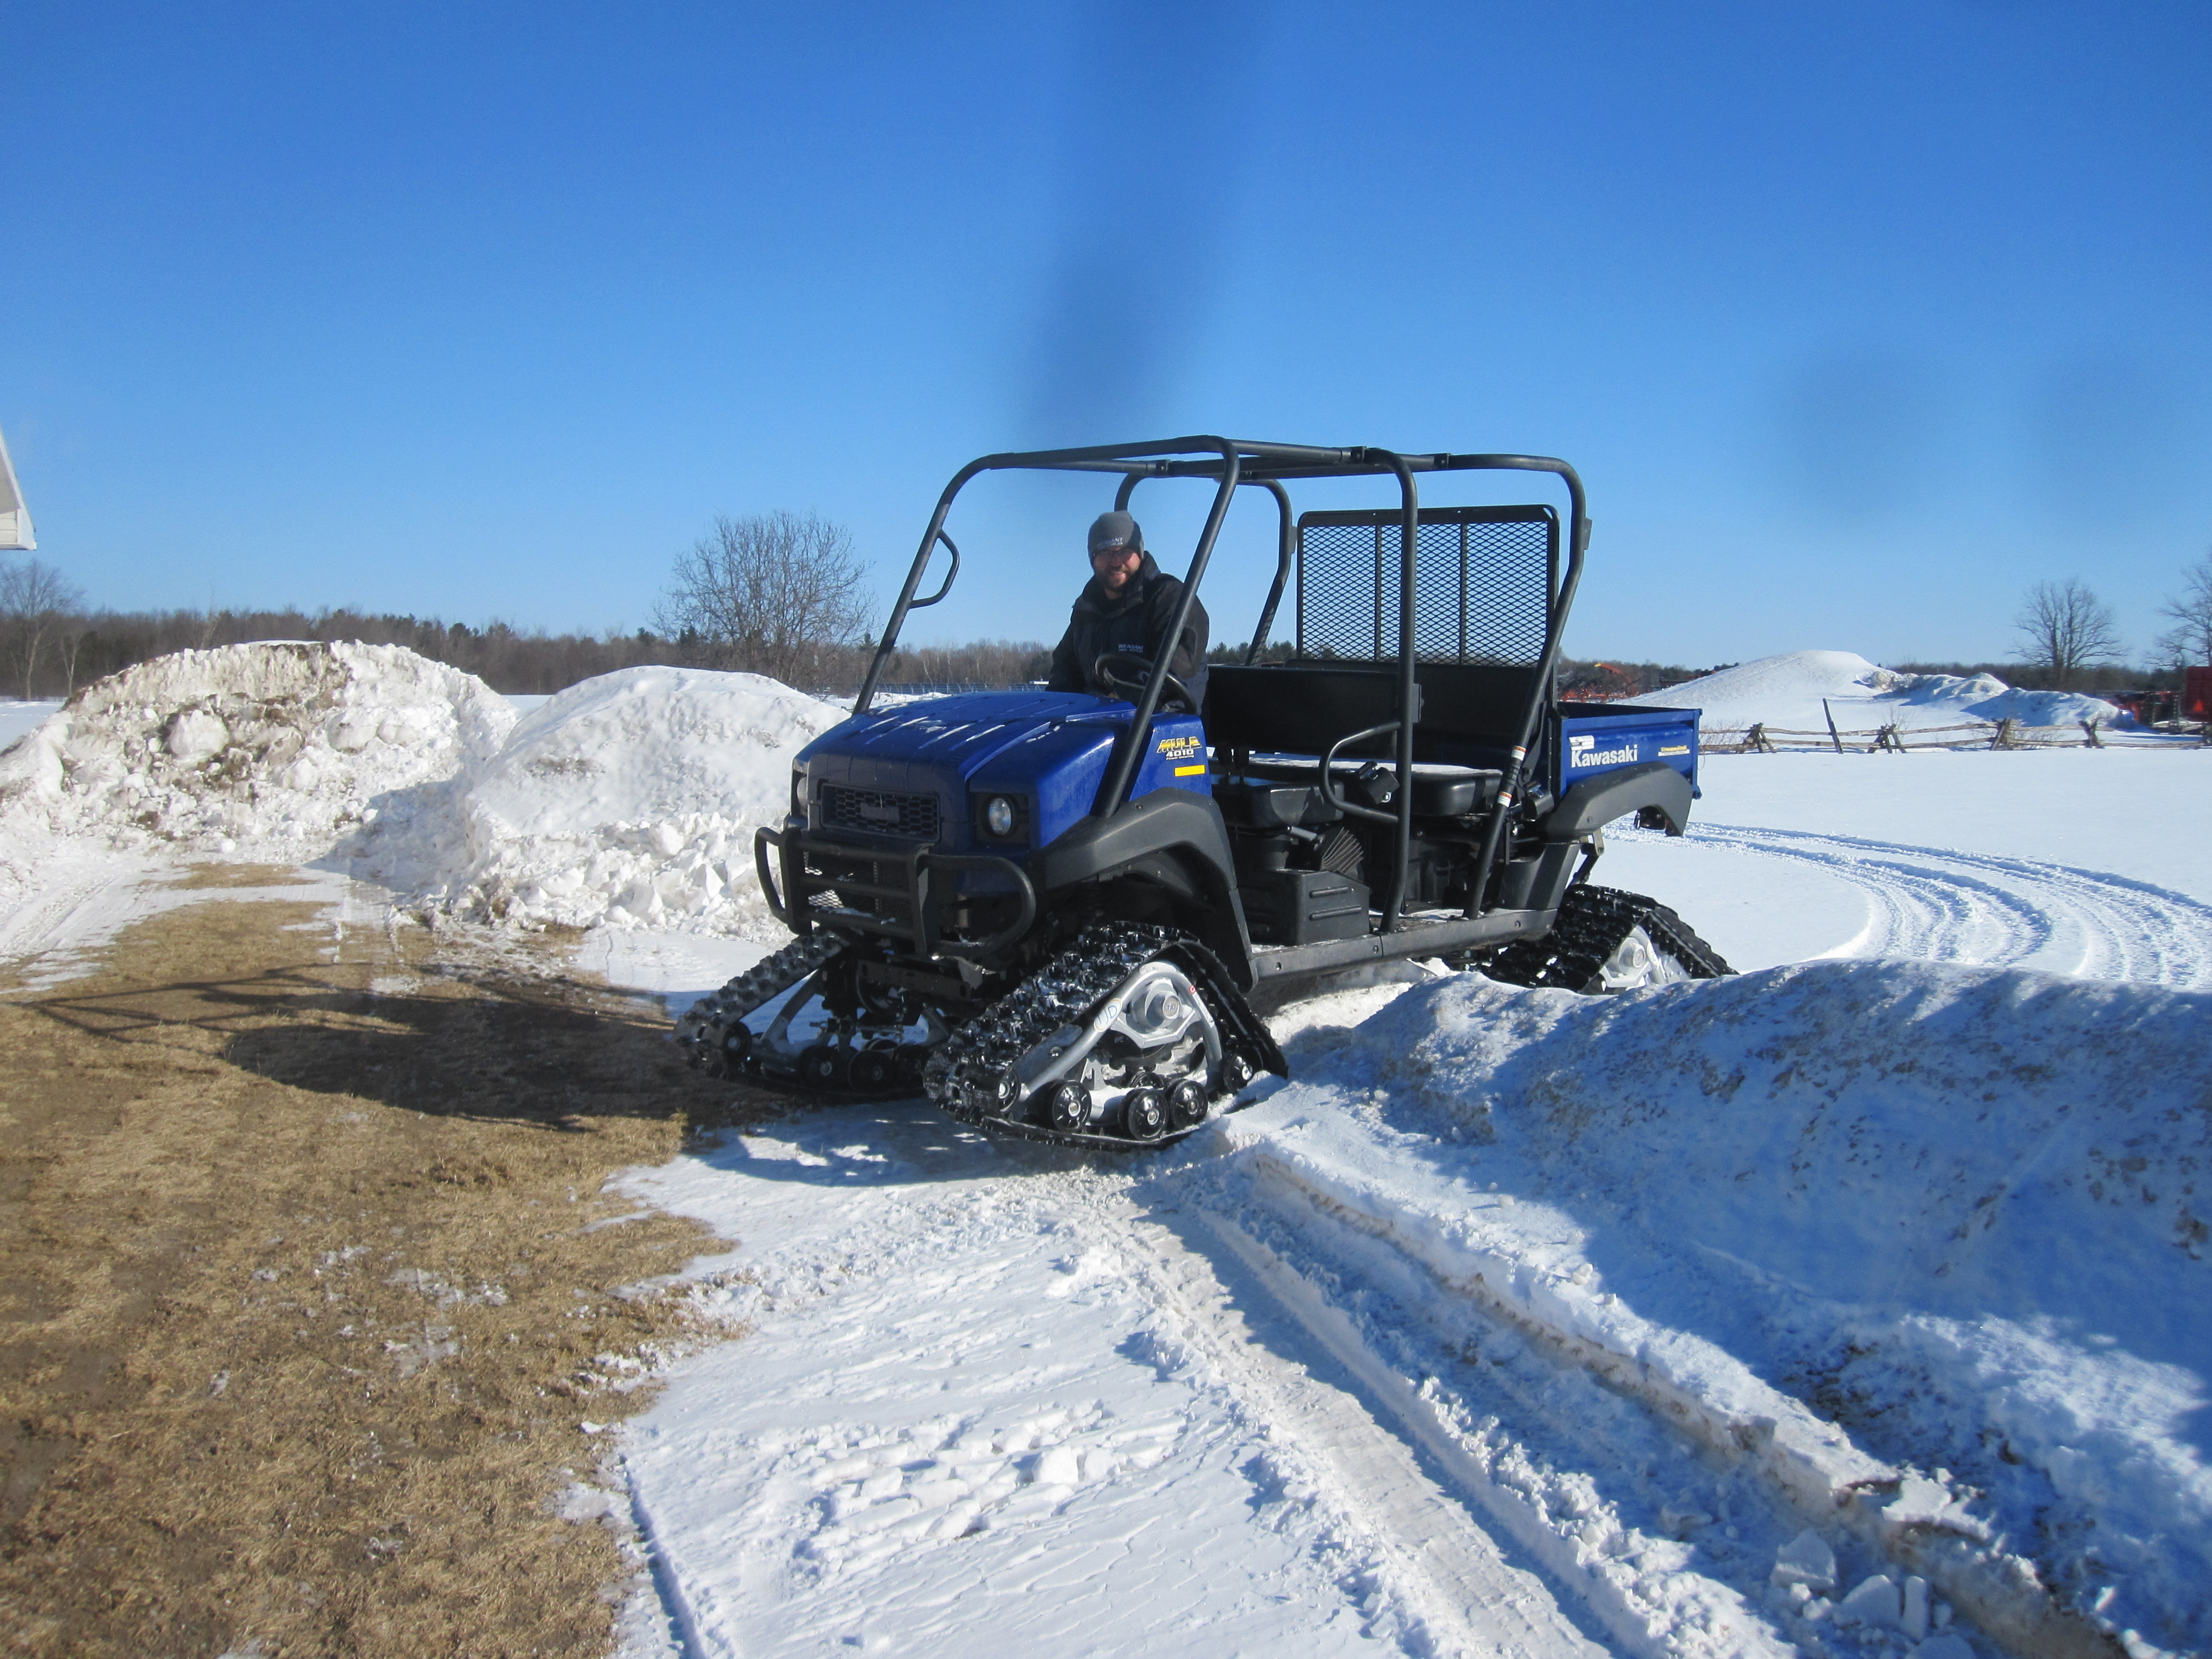
Mule on tracks
March 3, 2014

On Saturday Kijiji showed a photo of a 2013 Kawasaki Mule 410 Trans equipped with tracks at Weagant Farm Supply in Brockville. I resolved to have a look. Monday dawned -22C and clear. What better day to test how a Mule starts than a sub zero morning? With any luck I’d get to drive the tracked one in snow, as well. I’d read that vehicles need power steering to turn successfully with tracks mounted. The Mule 410 Trans has electric steering assist standard. That’s a thousand-dollar option on other brands.
I kidded John MacDonald about creating a “halo” Mule to improve sales: people like me would come in to see how well the thing handles deep snow, then buy a Mule on regular wheels with the mental insurance policy that they can get tracks for it if another heavy winter like this one comes along again.
With our fists we pounded the ice off the front seat. From the ground on the right side John reached over and turned the key. A quiet purr began somewhere around the rear axle. That was starting. No fuss at all with the EFI system. I stepped aboard.
The Mule backed down off its snowbank perch with only a little roughness in the driveline. This vibration went away quickly after a full turn of the tracks. Must have been a bit of ice trapped somewhere. John drove us to a nearby snow-covered lot. Progress down the shoulder of the road was quiet and slow.
The tracks reduce the drive ratio by 2:1. The 20 hp engine works best on tracks if left in low range, producing another reduction in final drive ratio. In winter mode the Mule is definitely a slow and steady machine.
But it floats over deep snow like a good pair of snowshoes.
I found some drifts to explore. The Mule slowly pushed through without hesitation. I ran it up a steep, icy bank. Same engine sound, no problem. Then it backed down easily when I realized that there was a precipice at the edge of a chain link fence on the far side of the snow pile. I couldn’t find any snow which could change the Kawasaki engine’s tone. It sounded as though it would idle along, regardless of load, for as long as I wanted to push through snow.

On my way out of the field I tried unsuccessfully to high-centre the Mule on a snowbank. Too much ground clearance with the tracks installed. That was a relief. My back is still a little tender from another belly-hang with a Ranger where I should have used a tow rope, but chose to push instead.
From what I have read online and observed, a Mule with a few hundred hours on it shows every prospect of many years of faithful service. If you need a workhorse which seats four or more people and starts very well more than you need high-speed performance, one of these Mules back off lease might be a good choice.
First impressions of a used 4-passenger Mule
February 6, 2014
Today I stopped by the local farm equipment dealer to have a mid-winter look around. It’s a Kubota/Kawasaki dealership, and I noticed some extensively-used four-passenger Mules on special. The sales guy told me they’re back off lease. All of the returns are 2013’s. The one which interested me has 725 hours on it, blue/purple paint, not too many dents on the box, and a year left on extended warranty. The price caught my attention.
I drove it around. The EFI engine started well on a sub-zero morning. Electric power steering helps. The 20 hp Mule felt gutless after my much lighter 18 hp Ranger, which is eager to get to its 25 mph top speed. Mind you the sales guy says these engines are all about low-end torque.
Basically the Mule is ugly but highly functional, with belted, rollover-protected seating for four people.
They rent the Mules to the installers of solar farms, so there are a lot of them on the go right now. The only trouble they’ve had with them has been in fall when the mud balled around the drive shafts the day before has frozen hard. Then the operator jumps on and tears off in the morning, occasionally snapping a 1″ axle.
Downsides? The extra-seat Mule seems long and cumbersome. It’s polite and quiet, but slow. It’s not my Ranger. I caught myself wondering if it would do the little u-turn at the end of my driveway when I drop off the garbage on Wednesday mornings.
I think the Mule’s hampered in an initial test drive by its lazy 20 hp engine and considerable weight. Online I read that the suspension travel’s not great, in the order of 3″. Ground clearance is 7.1″, less than my 2WD Ranger’s.
Of course Kawasaki claims only that the Mule starts well, uses little fuel, and pulls strongly at low speeds. The shifter looked to me as if it would stand a lot of forward-and-reverse work while plowing snow. The Ranger’s shifter to me feels too fragile and notchy for such an application.
I watched a video of a Mule equipped with a good plow fighting with a foot of heavy, wet snow. It wasn’t fast, but it moved the snow pretty well. In another video I watched a Mule try repeatedly to climb a steep, sandy hill. It seemed to run out of power or traction, or driver ability, but to my surprise it didn’t make it up a slope I thought my 2WD Ranger would climb.
The Mule’s more tractor than sports car, but it might be a good machine to own.
