Porsche Yoga
September 18, 2016
In need of a way to keep active I accidentally hit upon Porsche repair. HVAC work on the car demands long periods of kneeling on a matt with repeated stretching activities rather like yoga, so I have coined “Ruby Yoga” as the generic term for hours and days spent on this magnificent and exasperating puzzle which is an early model Cayenne.
16 September, 2016, evening
This morning ticking noises from the dash drove me to remove the glove compartment and associated trim in search of something I could bang into place and correct the problem.
I must specify that I haven’t road tested the car at this point, but in the case of the actuator attached to the white plastic rod, I removed it and discovered it was jammed at one end of its travel, so I pried the case apart with a couple of fine screw drivers.
The first of the many actuators (known on eBay as “AC Boxes”) opened up like a lunch box, revealing contents in good condition. Because of the triple-reduction worm gears I couldn’t wiggle anything, so I popped the gears out and played with a tiny 12V battery and fine telephone wires, laying the bare contacts along the two poles attached to the end of the motor. This worked, so I added a couple of dabs of white grease to the gears and sent motor power along to the complex part at the other end whose gears also appeared to be intact.

Reversed polarity moved the arm back, so it seemed that the mystery part would still function. Of course the touches of 12V were very brief, as the travel of the actuator is short, so I simply turned over my pair of wires to reverse the motor to complete each cycle.
After I had played with the thing enough to get the grease worked around the gears, I popped the top half of the case back on and put it back on the car.
When I turned on the key and experimented with heater buttons, the “recirculate” and “fresh-air” buttons caused the device to open and close an unseen flap by alternately pushing and pulling on the rod.
My harassment of the other actuator more properly falls into the burnt-fingers-methodology classification. I could hear the thing trying to cycle, but I could only see the top of a white arm, or lever, where it joined a black box. Let’s call it an arm for now. It appeared to be stuck, with a wire or spring over the top of it. I could just see one end, so I grabbed the scope and started probing, seeing if I could get a better idea of how it worked. Wary of short circuits, I attempted to put tension on the spring with the lens of the scope, but opted for a forked green twig about ten inches long. It moved the spring around in a satisfying manner, and it eventually settled in what looked like an appropriate slot from my perspective.
Further examination with the scope revealed a dark something connected to the white arm. At first I had thought the arm wasn’t working because it had become disconnected from whatever it was supposed to push, but there was something dark and plastic moving around, enclosed by the white nylon. So I bumped into the assembly a couple of times with the scope. Didn’t seem to hurt anything. I cycled the temperature selector from low to high. The assembly seemed to be moving both ways now, and began to complete cycles.
I set the temperature for 16 degrees, half-way on the dial, and called it a day. I had unwisely taken the lower half of the dash off the driver’s side and would need to re-assemble it before any further testing, so I did that and then called it a day.
After breakfast I’ll take the Cayenne for a test drive and report further.
17 September, 2016
Still no heat in driver’s footwell. The mystery actuator isn’t cycling this morning, so further examination is in order before I reassemble the right lower dash.
It stayed quiet at 16 degrees until I turned the heat up. Then it started making noise again. At MAX it quieted down, but provided no heat on the left side. Chances are a part needs to be removed and examined, if not replaced. There are sets of seven of these AC Boxes for sale used on eBay for $100. I’m thinking about buying one.
Must examine the manual again. Seems the actuators are bolted in groups to a metal plate which can be removed from below, though how and where is beyond me at this stage.
The manual keeps departing from illustrations of the actuators on their plates to show this heat exchanger which doesn’t look anything like the one behind the glove box. It explains how to remove one screw and open the thing to make space for the removal of the plates with the many actuators attached. Turns out the diagram refers to a small black plastic box way back in behind the obvious stuff, and there was no way on earth without a 5 mm box end wrench (I think) to get that screw out.
So I worked around it. There was room. Devilishly difficult job removing the two screws holding the plate for the single (surprise) temperature mixing solenoid, though. Took all day. For some reason my predecessor had installed one of those Porsche safety screws, a torx with a centre post, to guard access to this area. The manual had it as a Phillips. Fortunately, my Porsche-loving son has a set of them.
Once out, it was a simple matter to revive the actuator’s jammed mechanism, though. The white part of the hot air-blending adjustment mechanism plugs into a black box in there. The actuator arm is the mysterious black thing I couldn’t see yesterday. I reached in and wiggled that white arm and it came off in my hand. Seems it’s been repaired before and the O-ring which supposedly holds it in place no longer exists and there’s some wire holding it together. I carefully meshed the geared shaft back into the gears inside, still without the O-ring. It’s a bit reassuring to know that even the pros occasionally become desperate enough to jury-rig stuff on Porsches.
Equipment suggestion: a regular torx screwdriver is too short to reach the first screw holding the plate. For reassembly I used a Phillips screw and a long, thin screwdriver I use for assembling door latches. I taped the screw to the driver and had it jammed in place within a half-hour. Easy.
The second screw? I left it for later. Figured I’d be back with an O-ring if the thing worked. Interestingly, I found the second screw had been so hard to remove because it had been jammed into the surrounding plastic moulding rather than into the metal clip which had come free of its slot and was sitting below. I could feel for my predecessor in this situation: he was on the clock; I have all of the time in the world.
Equipment suggestion: without the scope I would have had no hope of locating, let alone removing, that second screw. I used a 24” flexible device which takes screwdriver bits and holds them magnetically. It was too long for comfortable use in the Cayenne’s cabin. Perhaps if I had removed the passenger seat things would have been easier.
18 September, 2016, 9:30 a.m.
Ruby’s back together and no worse for the wear I inflicted upon seats and doors. Cabin courtesy lights work normally, and no warning lights have appeared on the dash. I half expected a screen to pop up: “Unauthorized goon has tampered with HVAC controls!” Maybe that will wait until Ruby is fully warmed up.
For now, the AC blows cold all over and the annoying ticking in the dash has measurably reduced. No doubt I’ll have to go into the left side to get the rest of the clicks and some heat to the driver, but that will be an adventure for another day after I have acquired a few small tools and perhaps a set of used actuators, or AC boxes, as they call them on eBay.
Tool wish list:
5/5.5 mm box end wrench
Torx size 20 (safety) screwdriver with a long shaft
Set of replacement actuators for AC
Annotated Bibliography
2003-2008 Porsche Cayenne Repair Manual sourced online for $15 US, it proved to contain valuable and occasionally accurate information, at least on the mysteries of the HVAC system. The big surprise was that my car Ruby contained fewer of the offending actuators than the diagrams promised, and it made no mention whatever of the first one I worked on, the actuator bolted to the big air box sitting behind the glove compartment. But it told me the location of mystery screws so that I could locate them with my scope and labour to remove them.
Ada comes into our lives
September 15, 2016

Yesterday was the beginning of the full moon, so Ada Croskery decided it was time to enter the world at Ottawa General Hospital. To the delight of Roz and Charlie and the four assembled grandparents, she presented herself as a good natured and inquisitive little creature, undisturbed by the flocking parental units brandishing phone cameras.
Welcome to the world of the selfie, Ada.
I keep telling myself that the birth of a child is the most ordinary thing in the world, but I don’t believe it for an instant. This is the first grandchild for Ken and Helen Dakin of Burlington, as well as for Bet and me.
While the “competing grandparents” waited in a surprisingly comfortable waiting room for Roz’s 2-hour push, we were joined by a frazzled young woman with three rambunctious toddlers of Haitian ancestry. Their single mother had come in for a routine checkup with the kids in tow, only to be sent for an immediate c-section. This kind French-Canadian friend did her best to ride herd on the well dressed but tired and very loud kids who seemed to range from two to five in age. They had nowhere else to go without their mother.
At length Charlie came along, proud as punch, to announce that Ada Croskery had entered the world — no middle name yet — and that we would be able to visit the family in the birthing room in a few minutes. A study in contrasts awaited us as Bet and Helen, arm in arm, parted the curtain to meet The One. Roz was a study in composure. Ada was relaxed, a little sleepy, but primarily aware of her tongue and upper lip. To my untrained eye, she looked a lot like a small Cabbage Patch doll. Maybe it was the toque and the tight swaddling which made her into a 24″ package, readily passed about among the grandmothers.
Roz was a bit tentative on the kid-holding, keeping her positioned across her chest and patting the part of the package opposite to her head. I assumed there were feet down there, but she could have had a tail for all I knew. Bet assured me that Biologist Roz would have made sure all of the parts were there.
If she could focus at the time, Ada’s first impression of family members would have to involve smart phone cameras, flashing gently but incessantly. Charlie had assured us that the flashes wouldn’t be a problem for her.
So today Ada will make the journey home to the family’s downtown apartment. This will be a new driving challenge for Charlie. Roz’s mother will stay around for a couple of days to help out, and then they’ll be on their own. The apartment is a ten minute walk from Charlie’s office, though, so he hopes to get home for lunch each day to give Roz a break.
So away they go down the dizzying slide of parenthood, while we oldsters, bolstered by the new relevance, content ourselves with acquiring trinkets and making plans for visits and Thanksgiving.
Amazon’s $99 Cayenne control arms: some fitting required
September 1, 2016
It was time to register Ruby in Ontario, so we drove through an emissions test at an oil changing station in Kingston. No problem.
Then we followed my mechanic’s lead to a new Midas franchise. At Brian’s request they took Ruby right in for the mechanical fitness inspection. After a long and thorough inspection and numerous consultations with colleagues, the mechanic reported three items which needed to be replaced before a pass: both front lower ball joints, and the rear wiper blade. Three staff members commented on the lack of corrosion on Ruby’s underbody. “You don’t see cars like this in Ontario.”
But then came the quote for the parts. At $455 per after-market control arm, the bill would come to over $1100. plus installation. I showed the service manager the same parts listed for $99 each on Amazon.com, and we arranged for me to bring the car back in after I had completed the work.
So I hit the “order” button on my phone. 24 hours later the parts appeared at the local Kinek outlet at Wellesley Island Building Supply, just across the Hill Island Bridge.
Following these online instructions carefully, I had no difficulty removing the right control arm.
Then I discovered that a $99 control arm may have the odd fit issue. The casting and bushings looked good on the new unit, but the whole thing seemed bigger than the French one I took out. Specifically, the threaded tail of the ball joint was about 1/2 inch too long. With the bump on top of the socket, the unit wouldn’t fit beneath the quarter shaft so that the ball joint could drop into its space. It was too big to fit. I was forced to round off the top with an angle grinder, and cut 3/8″ off the threaded part. Then it worked.


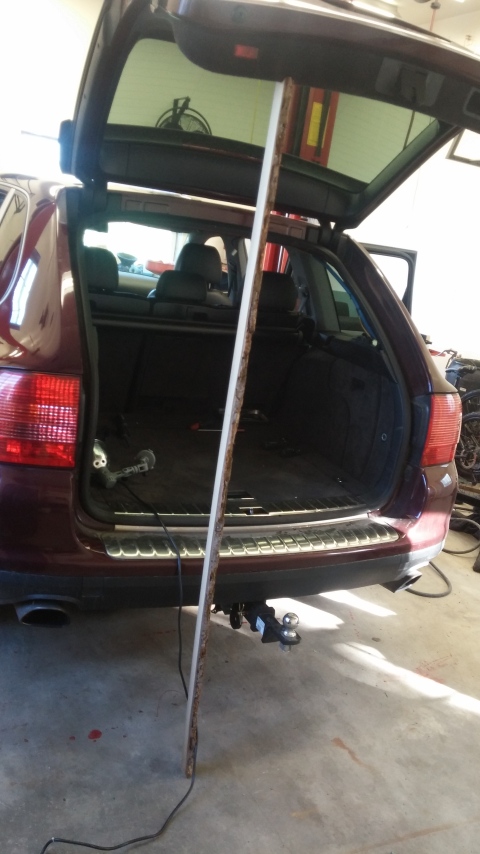
Replacing Porsche Cayenne rear door struts: what the You-Tube videos did not tell you
August 29, 2016
There are a couple of decent instructional videos on You-Tube which show the replacement of rear door struts on Porsche Cayennes, but there are some gaps which my assistant and I explored recently on our project car, a 2004 Cayenne named Ruby.
Disassembly:
The videos do a good job on the disassembly process up to the point that you and your screwdriver must work in the dark to release the old struts from the balls onto which they are clipped. The comments which follow may allow the reader to avoid an evening of burnt-fingers thrashing about similar to the one I enjoyed last night.
Don’t bother with the clip which holds the cup onto the forward ball. You can’t reach it. The ball is very sturdy and you won’t be re-using the strut. Pry it off with a large screwdriver and brute force, applied in the direction of the centre of the car, wherever you can find leverage in the restricted area. Yes, that’s an explosive air bag an inch or so to the side of your screwdriver, but the cavity where these struts hang out is good, solid metal.
Once it is released, get into the back seat and reach over the headrest to remove the rear cup. Push or pry it away from the centre of the car. From the back seat with the help of a light you can actually see what you’re doing. Once the strut comes free, push it as far forward as you can, wiggle it to the best possible location to remove it, then persuade it out by compressing it a bit with the large screwdriver levered against the very sturdy sheet metal in this area.
Installing the new struts:
1. My aftermarket struts arrived with both cups on the ends oriented in the same direction. I needed to rotate one of these 180 degrees. This involves the services of a vice and pliers or some other brute-force applicator, as the cups clip on in opposite directions. A little grease on the cups would be a good idea.
2. There is actually a line of sight up to the forward ball from the rear luggage compartment, and you can see well enough to place the strut-end on the ball — as long as it isn’t actually up in the cavity where you must install it. Don’t put it on yet. Once you have forced both ends of the strut into the cavity (which is 1/8″ too short for it) this advantage is lost, but at least you know where it should go.
3. If you’ve put a bit of grease on the cups, the first “click” onto the front ball goes very easily. (Getting it off again is another matter, so don’t experiment too much here.) The second click onto the rear ball (on the other end) can be achieved (from the back seat again) if and only if the rear door is held at the correct height. A piece of scrap lumber from the shop, band-sawn to the contour of the door’s bottom so that it held the door’s lower edge 75 1/4″ from the garage floor, allowed both ends of the strut to pop in without the use of force. There’s enough taper to the bottom edge of the door to allow for some adjustment using this dimension.
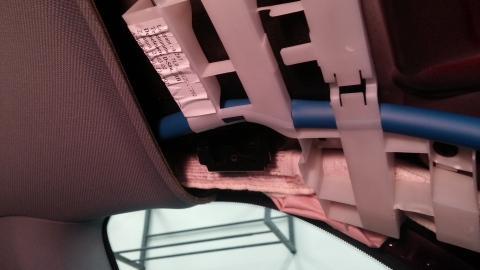
Reassembly: The videos do a good job on most of this, so I’ll just offer a couple of observations.
1. The plastic panels are quite durable. Removing pulled-out clips from the sheet metal slots on the body and re-attaching them to the panels is not a delicate procedure. Just remember those explosive air bags and take your time and be careful to locate all pins and reconnect them to the plastic panels. I kept loose metal parts on a magnetic tray in the hatch with me. You do not want to lose a screw.
2. Those white filler pieces gave me the most trouble, even after I had photographed one to determine its position relative to the panels and the cable before I removed it. HINT: start with the screw the furthest from you. I wasted far too many minutes trying to find its hole after I left it until last.
3. Lost speaker wires can be recovered from the luggage compartments below on either side.
4. The trim panel won’t fit properly until you have screwed the tiny torx screw into that safety-screen holder. That tightens the whole thing up. The trailing end of the left side panel on mine decided to act up. There’s a plastic pin on it which refused to reunite with the corresponding hole on the black piece below. A few probes by a 5/8″ woodworking chisel with a view to cutting the pin off (there was none on the right side) resulted in the trim popping into place, so I put the chisel away, recalcitrant pin intact.
The Porsche feeling:
The car is more my own after I have taken it apart and fixed it.
The You-Tube videos gave me the courage to tackle the job. Initially it was a challenge for a non-mechanic, but once I realized that the components are quite durable and there is room for the use of common sense in Porsche repair, it went well.
Parts for Ruby
August 28, 2016

Ruby’s rear hatch only remains up during certain combinations of heat and humidity. Charlie and Roz had held it in place with an umbrella, but I yearned for a wrenching project on the car as far as possible from the oil pump, lest I mess it up.
I acquainted myself with the strut-replacement procedures by watching and rewatching the You-Tube videos and ordered the parts from Amazon.com. They arrived at the Kinek outlet on Wellesley Island, NY, within two days. The price was reasonable, shipping was included, and I really didn’t have anything to complain about.
But does this quantity of packaging for the two small black parts in the foreground look reasonable?
Sam
August 27, 2016
When I was a young teenager I had a yearling Chesapeake Bay retriever named Sam who was very rambunctious. He liked to follow me on my bicycle when I rode the short distance to the post office in Westport. One evening Sam was delayed by something along the way, then came blazing down the middle of Spring Street to catch up, still looking back over his shoulder at whatever it was that had distracted him. He didn’t notice Mrs. Murray in her Volkswagen Beetle, headlights on, stopped in the middle of the street as he approached. He hit the Beetle head-on, landed running on the sidewalk, knocked over my neighbour Chris on the corner, and hid in his kennel at home. Finally something had gotten Sam’s attention.
My parents paid for the broken windshield wiper on the car, and Sam seemed no worse for the wear. Chris Murphy, a lad about my age and used to a few knocks from sports, was more bemused than hurt by the encounter with the fleeing Chesapeake.
But for years afterward on hot days, half-way through his run in the woods with me, Sam’s hind legs would quit, and I’d have to carry him home. This was a challenge, lugging the large dog, shotgun, and knapsack the half-mile or so back to his kennel. Once he had rested for a bit, his legs would go back to normal.
Sam had the pain tolerance of a cement block, but he didn’t seem to be hurting when his legs went out, just a bit bewildered.
This was before the days of veterinarians, so I don’t know what the diagnosis would have been, but I rather suspect the back problem was a result of the collision with Mrs. Murray’s VW.
Ruby’s trailer hitch
August 23, 2016

I’ll never belittle a factory-installed trailer hitch option again. Sure, 1D6 Trailer Hitch without Ball cost $2110. and had never been used. But I ran Ruby up the hoist, backed the four screws out of the cover plate, and slid in a 7 pin hitch adapter from Amazon.ca.
Next I slid a 7 to 4 pin adapter onto the wires from my fishing boat trailer and hooked it up. Everything worked except the right tail-light on the trailer. The wires were too short to turn right, though. As I got ready to lengthen the wires I noticed a pinch which had broken the green wire. An hour of splicing later, everything was set.
I started the car and the dash warned: “Check your trailer lights!” This icon wasn’t going away, so I got out, checked the lights, and returned. Ruby was satisfied with this and gave back the normal dashboard display. Next time I started the engine it was the same scenario, but I discovered I could outwit my nanny by simply opening and closing the door.
At the minimum a thousand-dollar premium for a gee-whiz warning on the dashboard? If the hitch is only to carry a couple of bikes, the sophisticated wiring and heavy-duty hitch aren’t worth it, but with the 20′ car hauler sitting next to the garage, the hitch package may provide real value.
*My son has assured me that Ruby will still need a separate brake controller to handle a trailer with electric brakes, but I have found online that the wiring, complete with a four-pin connector, is neatly tucked into a nook just above the parking brake pedal.


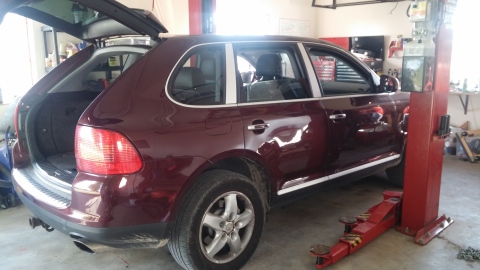
Working on Ruby: the new normal
August 20, 2016
 My neighbour joked about the last column which had a picture of Ruby on the hoist with a caption, “Welcome home, Ruby.” Well, Ruby does look at home on a hoist. The photo above may be a bit aspirational, but we’ll see.
Charlie commented: “Clearly this car has had an easy life in Vancouver; likely seldom even getting up to highway speeds, let alone making trips into the mountains. There is no corrosion on the bottom of a 12 year-old car. While Vancouver has very little bright sunlight, this paint’s brightness could only come from extended periods of inside storage.”
He further told me that the previous owner, a gold merchant, had bought Ruby from a friend of his in 2008, had it serviced by the same mechanic at a small shop, and then replaced it in 2016 with a new Porsche Macan. When the Macan went into his garage, Ruby had been banished to a crowded outdoor parking lot for the first time.
The project of the afternoon was to track down a growl in the right front part of the running gear. Drive shafts and brakes and rotors seem to be perfect, as are the tires. We turned off the stability computer and ran the drivetrain with the wheels lifted off the floor. Things turned smoothly and without vibration, though the superior power of the front brakes caused the driveshaft to wind up a little bit when I shifted into DRIVE and released the brakes. Charlie had warned me to start and stop very gently to prevent unnecessary strain on the drivetrain.
We checked the fluid level in the centre differential. It seemed a little low, about 1/4″ below the fill level. To access the front diff we had to remove the bottom plate, so we set about the twenty-minute job, eager to see what the bottom of the engine looks like.
It looks pretty good down there, though to check the fluid in the front diff we’ll need to be prepared to drain the fluid and refill it. The fill plug is hidden behind a large strut, possibly requiring a specialized tool to open it.
These plugs appear not to have been opened in a long time. I’ll check You-Tube for instructions, buy a supply of Porsche ATF, a hand pump for the fluid, and plan on a pleasant rainy day changing diff fluids.
Update: 21 August, 2016
The fluids in the three differentials checked out fine. It seems the previous owner kept up with his maintenance. So much for the rainy-day project, though I’m sure Ruby will provide many more. The growl in the right front area of the car remains at pretty well all speeds.
Update: 22 August, 2016
My mother’s state-of-the-art wheelchair (which she doesn’t use yet) will in fact fit into the back of the Cayenne if I turn it on its side. It looks as though the wheel is sure to hit, but it seems to brush the glass of the hatch without putting any pressure on it. Her physiotherapist explained how to collapse the thing by removing the seat cushion and folding it, but I like the grab-and-stuff approach better if Mom needs the chair for an ice cream run.
Welcome home, Ruby!
August 17, 2016
The voice on the phone from Livingston Vehicle Transportation in Vancouver had told me that Invoice #104*77 would arrive on August 15th, at the latest, but I could call back next Friday. She gave me a Montreal number. Surely enough, Ruby arrived on the train over the weekend, but it took until Wednesday morning for her to end up on a truck, destined for Doug’s Towing yard just outside Embrun, to arrive between 10:00 and 12:00. Doug promised me he would call the instant that my Porsche arrived.
At 12:00 I phoned. Doug enthusiastically told me, “They’re just unloading your Cayenne now.”
“I’ll be there in an hour and thirty-eight minutes.”
Our first sight of Ruby was a little pathetic. Some wag had parked it straddling a large mud puddle — real, beige clay, the stuff that sticks to everything. What paint wasn’t spattered from the puddle looked very clean and shiny. It must have had a good ride on the rail car and the truck, but puddles are puddles.
Livingston Vehicle Transportation had done the job well which they had contracted to do.
I made departure arrangements with the genial guy in the office and started Ruby up. As soon as I moved forward an alarm went off: “Parking brake is still on,” or “Release parking brake,” or something. Here I was, stopped in a muddy, crowded parking lot, with very little idea of how to release a stuck parking brake. While I fussed, Bet stepped out of the Lexus and walked toward me holding her phone out. Column after column of “How to free a stuck emergency brake” appeared. Bet had resorted to the Porsche owner’s secret weapon, Google.
Most of the articles suggested worrying the release handle until the problem went away, and so I did, but not before sending a distress text to Charlie. By the time he got back to me I had the car moving properly, but I was too confused about the ventilation system to check for texts.
And it was HOT in this truck. Fortunately the route from Doug’s Towing to Smiths Falls involves a number of short drives across paved concession roads with no traffic — a perfect place for me to sort out the dashboard of a Cayenne. Why do they have two speedometers, two temperature gauges, two range meters (saying different things), and many other switches and buttons I was unable to fathom? And acronyms! Why do Porsche fanciers love acronyms so much?
As I roasted my way through a burnt-fingers exploration of the air conditioning controls, the sight of the Lexus cruising serenely along in front of me, the cool Lexus, chilled seat and all, that stately old gray car looked pretty good to me. The es330 was all about passenger comfort, and its designers did their job well. I can’t say the same for the Cayenne S dashboard controls engineers.
Gradually as I worked my way through all logical combinations of controls and vectoring flaps, I decided to try the counter-intuitive step of punching the icon which looked most like a defroster. Swoosh! Serene air all around me. I wondered if anyone else has tried that before?
I opened the sun roof, but found it was just too hot. I preferred the air conditioning. And to think my initial plan was to buy a Miata.
Incidentally, the Cayenne drove and rode very well, but operator comfort comes first. Performance is well down the list on a first drive.
I stopped for fuel in Smiths Falls and Bet cut for home. Freed of supervision, on the way home Ruby stretched its legs enough to impress me with its power. It will pass on a two lane highway with ease equal to that of the Lexus, but while the Lexus will top out at 110 or 115 km/hr on a typical pass, Ruby must be slowed down from 150 after an equal acceleration interval. This will take some getting used to.
After three and a half hours of driving and trouble shooting, we arrived home exhausted. Ten minutes later Ruby was hauling us to a local restaurant for a meal.
New toy, eh?
How do we prevent the next loner terrorist?
First and foremost, stop using the names of those who have committed acts of destruction. It is critically important that the media cease and desist from glorifying the actions and the names of these misfits. That photo of the jerk with the old deer rifle on Parliament Hill has probably done more to promote this brand of nihilism in Canada than any ISIS propaganda.
It’s up to you, Canadian journalists, all of you, to shut down that impulse you all have to make stars of these isolated failures.
I suggest that from this point on we use Orwell’s unperson to identify each wannabe terrorist, providing a simple identifier such as “Parliament Hill unperson” or “London unperson” to distinguish among them.
We must no longer provide the significance of remembering their names. That tribute is for veterans who gave their lives in service of Canada.
Legislation has required a number of changes in the diction of journalism, particularly in the areas of race relations and gay rights. Would it be too great an effort for Peter Mansbridge to refrain from rolling the name of the latest miscreant off his tongue and reconfigure his script to avoid saying it?
